Wednesday, February 24, 2010

Have fun with Blu-ray and DVD movies on your Sony Ericsson XPERIA X10

XPERIA X10, the first Android device from Sony Ericsson, is delivering a consistent user experience where communication truly becomes entertainment. The UX platform builds on top of the Open OS and creates a unique Sony Ericsson user experience by combining best-in-class entertainment features with signature applications, unrivalled integration of social media services and a rich graphical user interface. And an important lightspot of XPERIA X10 is the Sony Ericsson Mediascape which is the smart way to get all the music, photo and videos you want from your favourite friends and artists. This guide tell you how to convert MOD to MP4 with Pavtube MOD Converter, which is designed for camcorder owners to convert MOD to lossless audio and almost all popular video formats. It accesses content from everywhere—your phone, YouTube, PlayNow—and presents everything for you. In addition, the SanDisk supports up to 16GB for you to store anything.

One more thing, as Blu-ray and DVD movies are more and more popular, enjoying such HD movies anywhere will be a trend in the near future. It will be a nice experience to watch Blu-ray and DVD movies on XPERIA X10, especially on its huge and high resolution and pixels touchscreen. However, XPERIA X10 will only accept MP4 and 3GP video format, how can we put the dvd files into a phone for playback. That’s what I wanna share with you. Here we go:
Required software:

Pavtube Blu-Ray Ripper

Step 1: Download, install and launch Pavtube Blu-Ray Ripper

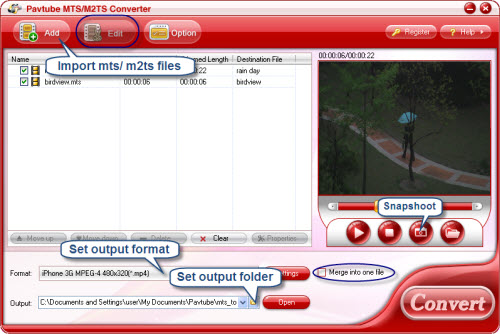
Once launched it, you can load BD files to it through three ways-"DVD Rom", "DVD Folder" and "IFO/ISO".


Step 2: Select subtitle and audio track

Click pull down menu of "Subtitle" and "Audio" to select your needed subtitle and audio track respectively. The drop-down list will show you all the info clearly, including language and stream ID of subtitle, language, audio codec, audio ID, and audio channel of audio. You can choose one at will, and the preview window will show you the changes in real time.

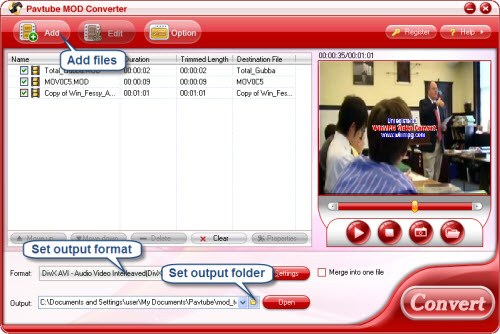
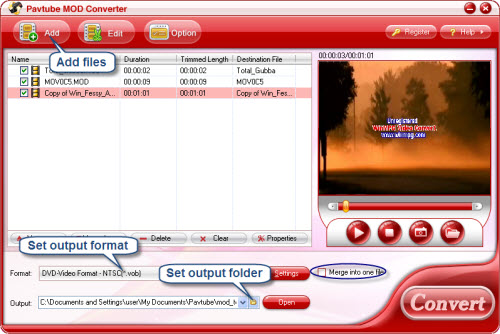
Step 3: Select output format

Click the drop-down menu of "Format" to select "Common Video"> "H.264 Video (*.mp4) as output format.


Step 4: Start Blu-ray ripping for X10

Once all settings are done, you can click "Convert" button to start Blu-ray ripping.

The output MP4 files can be found out via clicking "Open" button effortlessly, what you should do next is uploading the videos from your computer to the memory card of your X10.

Convert MTS/M2TS to iPhone ---- MTS/ M2TS Converter

We know lots of camcorders record video in MTS/M2TS that can not be compatible with iPhone. As a matter of fact, you may want to playback these MTS/M2TS videos anytime and anywhere, for enjoy them again or show off your excellent shoot skill. At this time you need a MTS/ M2TS to iPhone converter which can help finish the task. I strongly recommend you to try Pavtube MTS/ M2TS Converter. It is a useful tool to convert MTS/ M2TS to iPhone with very fast conversion speed.

Please find below a step-by-step guide for directly convert MTS/ M2TS to iPhone:

Step 1. Get ready for the conversion. Click here to download Pavtube MTS/ M2TS Ripper, install and run it.

Step 2. Load MTS/ M2TS videos. Click on “Add” button and navigate to your target files. When the selected MTS/ M2TS files are imported to file list, check the chapters you would like to rip to iPhone. You can edit the files by clicking on “Edit” button.

Step 3. Set output format. Click on Format bar, select “iPhone” from the format list and in submenu you will find MP4 format with different resolutions and MOV format for iPhone 3G. Select the suitable format and then click on the small folder icon to specify the output folder.

Step 4. Start conversion. Click on the “Convert” button and the program will convert MTS/ M2TS videos to MP4 or MOV for you to playback on iPhone or iPhone 3G in a few minutes. Now you can enjoy your favorite footage wherever and whenever.

How to select subtitles and audio tracks while ripping Blu-ray movies (TrueHD is supported)

Because of copyright issues, BD owners are unable to copy or back up their Blu-ray movies in a free way, even their purchased ones. To meet people’s needs, a lot of Blu-ray rippers are developed. However, the thing is that most BD applications are unable to deal with Blu-ray subtitles and audio tracks in an available way. With luck, I’ve come across a practical program recently, which enables users to select whatever subtitles and audio tracks you need, and I suppose lots of people are looking forward to the functionality, so I would like to share its detailed steps here, hope it helps.

The software I found is Pavtube Blu-Ray Ripper, which is an independent and professional utility to rip both Blu-ray discs and general DVDs to our wanted HD or SD media formats. With full Blu-ray disc support, it is able to remove copyright protections of our BD disc, no matter BD+, or AACS, even MKB Version > 10 is supported as well. With advanced audio technology, it is capable of reading all audio tracks of a BD disc, including Dolby TureHD Audio and DTS-HD Master Audio, which will never let you miss the mother tongue of the movie. Best of all, it allows users selecting subtitles to convert, and this is the feature that lots of similar software lacked.

Well, let’s to see the whole process of how to select subtitles and audio tracks while ripping Blu-ray movies via this program.WAF converter supports more than 20 well known formats.

Step 1: Click "DVD Rom", "DVD Folder" or "IFO/ISO" to load Blu-ray files

By the way, there are a number of .m2ts files imported, and usually, the one with the longest duration is the main movie.


Step 2: Select your wanted subtitle to convert

Click on the pull down menu of "Subtitle", then all the subtitles in the BD movie will be listed out, including language and subtitle ID, you can select one according to your own needs.


Step 3: Select your wanted audio track to convert

Click the drop-down list of "Audio", and then all the info about audio tracks are shown clearly, including language, audio codec(turehd is supported as well), stream ID, and audio channel, you can choose whatever you like to do conversion.


Step 4: Select output format and set destination folder

Click the pull down list of "Format" to select your needed output format, there are a wide range of options, here I choose "MPEG-TS HD Video (*.ts) for instance.


Meanwhile, you can click the folder icon at the opposite side of "Output" to specify where to locate the output files.

Step 5: Set advanced settings

Click "Settings’ button, then you will be able to adjust audio and video parameters in the following interface, including codec, aspect ratio, bit rate, frame rate, sample rate, and audio channel.


Step 6: Click "Convert" button to start Blu-ray ripping.

Once completed, you can find out the resulted files via clicking "Open" button effortlessly. Of course, these files are including the subtitle and audio track you have selected before conversion.

Wednesday, February 3, 2010

Convert MOD to Divx with MOD Converter

Do not know where to start with the .MOD video shot with your new JVC/Panasonic/Canon camcorder? Wanna learn how to make these video compatible with your player or codec? A best solution to get you out of the embarrassing situation is converting MOD to Divx, which is widely accepted due to its ability to compress lengthy video segments into small sizes while maintaining relatively high visual quality. How to convert MOD to Divx?Mac Video Converter is best video converter which convert FLV, MOV, AVI, M2TS, MKV, MOD, WMV for Mac os. Pavtube MOD Converter is one of the most popular software for MOD converting. It supports converting MOD to lossless audio and high quality video, including HD video. The converter generates Divx video in a fast speed and high visual quality. The following guide will show you how to convert MOD to Divx with Pavtube MOD Converter.

A step-by-step guide to convert MOD to Divx:
Step One: Import the MOD files to MOD Converter
Keep your camcorder connected to PC and run the program. See the interface? Simply click Add button and browse to the MOD files you want to convert, just leave out the corresponding MOI files. Pavtube MOD Converter supports batch conversion and combining multiple footages together.Tod converter for mac to play on iPod, iPhone, QuickTime, iTunes, iMovie, iDVD, Apple TV, iMovie etc.

Step Two: Set Divx as output format and specify output folder
Click Format bar, point to Common Video group and then select Divx AVI format. If you pursue highest video quality, you may follow HD Video-> HD Divx. Next you need to type in output path in Output bar or click the small folder icon to specify a destination folder. Check Merge into one box and the selected files in file list will be combined and output as one file. Click Edit menu and enter Trim window to cut off unwanted clips and reduce the output Divx to exactly what you want.

Step Three: Converting MOD to Divx
To start conversion, simply click Convert button. A progress window will pop up and show you the converting progress. It also allows you to set auto shutdown. After conversion you can edit the videos as you like.

If you are interested in Pavtube MOD Converter, please click here to learn more information about this program.

Convert MOD to VOB with MOD Converter

Pavtube MOD Converter is one of the most popular software for MOD converting. It will help you rebuild your JVC (MOD) and Sony (MPG) hard disc camcorder movie files to DVD standard VOB file. The converter generates VOB video in a fast speed and high visual quality. What’s more, it is fairly easy to use, you can finish the conversion in a few clicks. If you are seeking an easy-to-use tool for converting MOD to VOB, Pavtube MOD Converter is right what you need. The following guide will show you how to convert MOD to VOB with Pavtube MOD Converter.

A step-by-step guide to convert MOD to VOB:
Step One: Import the MOD files to MOD Converter.
Keep your camcorder connected to PC and run the program. See the interface? Simply click Add button and browse to the MOD files you want to convert, just leave out the corresponding MOI files. Pavtube MOD Converter supports batch conversion and combining multiple footages together.Mac Mod Converter is the easiest to use mod video converter on Mac OS.

Step Two: Set output format and correlative settings.
Click Format bar, point to VCD/ DVD/ SVCD group and then select VOB format with appropriate aspect ratio (4:3 or 16:9) and right video standard (NTSC or PAL). Then type in output path in Output bar or click the small folder icon to specify a destination folder.You can also rip Blu-ray to MP3, WMA, AAC, M4A, RA and put Blu-ray movie on your Archos, iPod, MP4 player, iPhone, Apple TV, PSP, Zune,and more. Check Merge into one box and the selected files in file list will be combined and output as one file. Click Edit menu and enter Trim window to cut off unwanted clips and reduce the output VOB to exactly what you want.

Step Three: Converting MOD to VOB.
To start conversion, simply click Convert button. A progress window will pop up and show you the converting progress. It also allows you to set auto shutdown. After conversion you can play them whenever you like.

If you are interested in Pavtube MOD Converter, please click here to learn more information about this program.