Thursday, January 28, 2010

Convert HD to SD with HD Converter

What is HD video?
HD video refers to any video system of higher resolution than standard-definition (SD) video, and most commonly involves display resolutions of 1280×720 pixels (720p) or 1920×1080 pixels (1080i/1080p).

Why we convert HD to SD?
High definition video is far superior in color and resolution over SD video, but we do need to convert HD video to SD video from time to time, since SD video occupies less space than HD video, and it is much easier to play and edit SD than HD video. If you want to convert Blu Ray to iPod,just download and try this powerful but easy-to-use Blu Ray to iPod Converter which can help you convert Blue RayNot every player supports playing HD video. When you are going online with it, or when you’d like to play it back on your portable player, it is a good choice to reduce the HD quality to SD to get the video play smoothy and save capacity. How to convert HD to SD? In this guide you will learn the steps to convert HD video to SD video with Pavtube HD converter.

Convert HD to SD step-by-step with Pavtube HD Converter
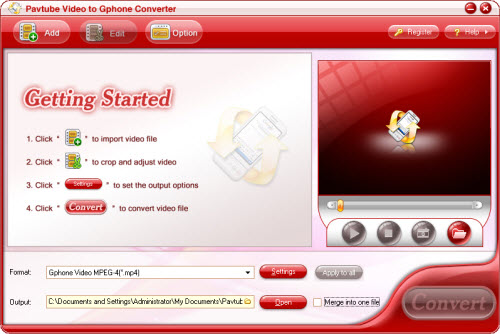
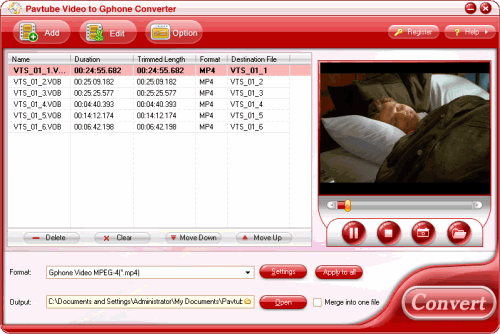
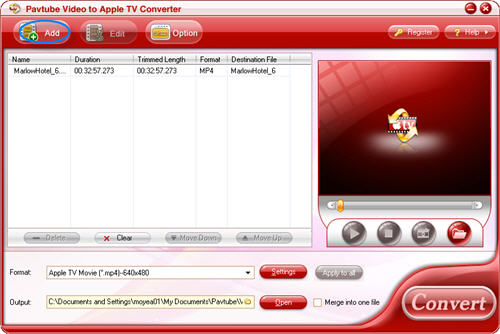
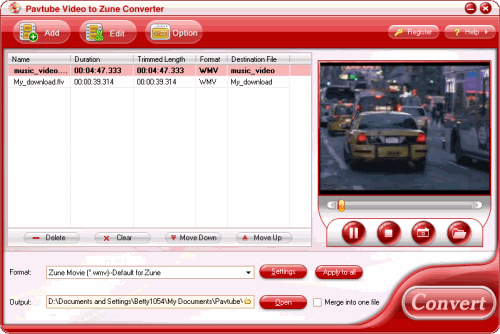
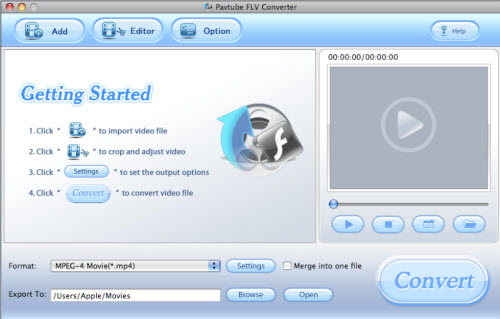
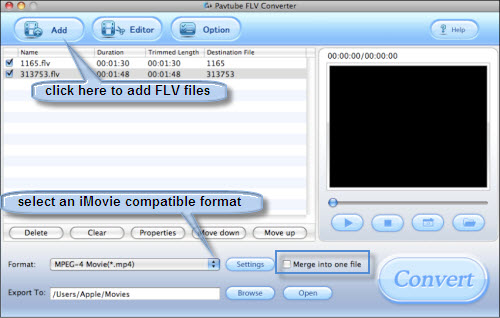
Step 1. Install and launch Pavtube HD Video Converter, add the HD video you want to convert to SD video. Mac Tod converter provides several optimized seetings for iPod adn iPhone.Press the Add button to load the HD file that you'd like to convert to SD. The program supports input HD formats like TS, M2TS, TP, TRP and other formats like DV, RM, RMVB, MP4, MKV, MOV, WMA, VOB, H.264, 3G2,AAC etc

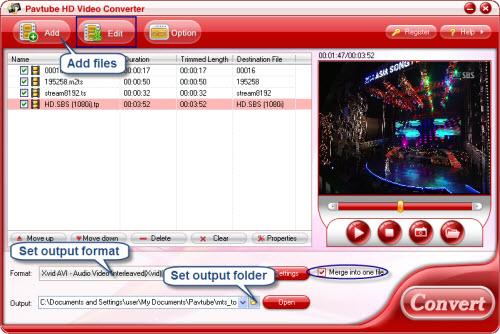
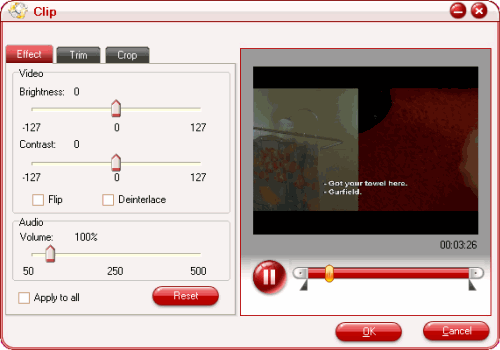
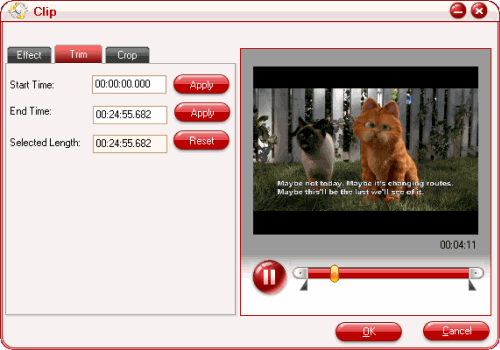
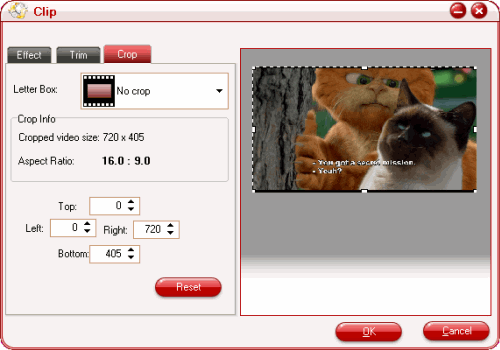
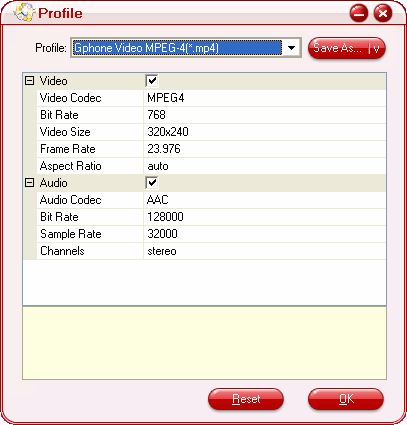
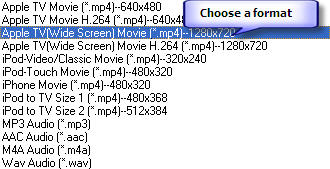
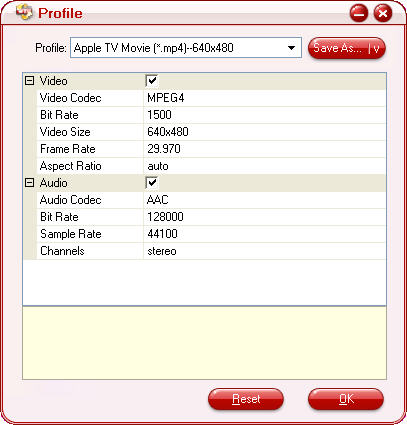
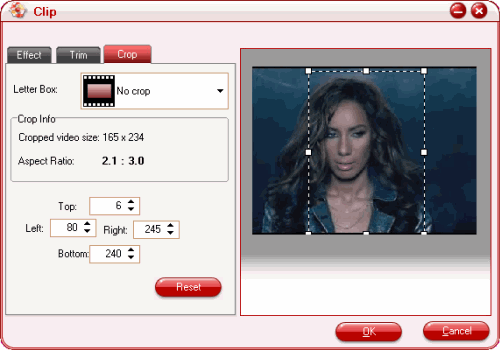
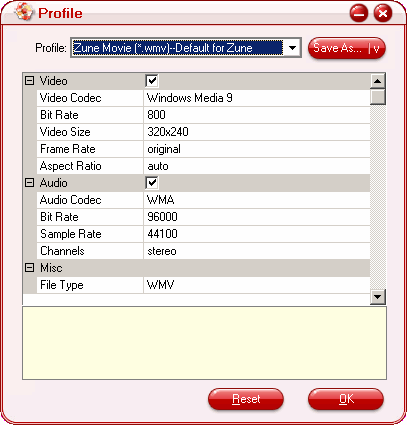
Step 2. Set output video format for your video conversion. Click the Format bar and move to Common Video and then select a format from drop-down list. Click Settings button and set output size, bitrate and frame rate. Smaller bitrate value leads to a smaller output SD file, which occupies less space. Finally, click the file icon beside output bar, and choose a destination folder for saving output files.Pavtube MTS/M2TS Converter for Mac is a marvelous conversion software.

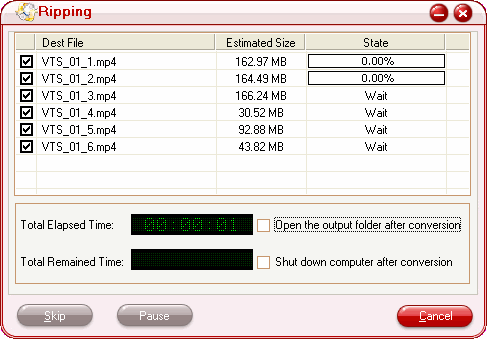
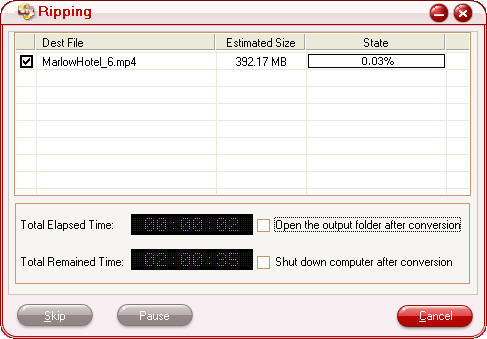
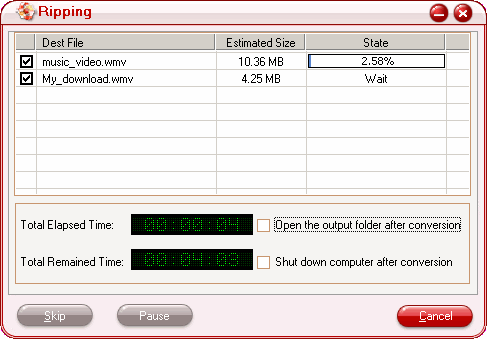
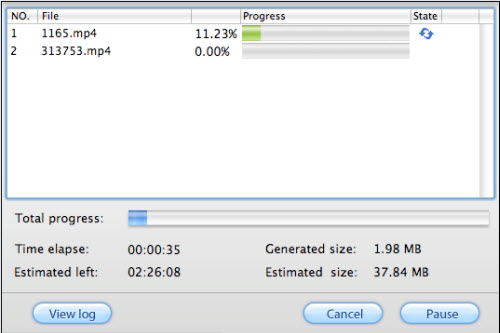
Step 3. Start Converting. Click Convert button to start conversion from HD video to SD video. Then you could find the converted SD video in destination folder. Now you can play them on any portable devices like PSP, iPhone, iPod, Apple TV, 3G phones or share them on internet.

With this program, you could convert HD video to SD formats to enjoy it whenever and wherever.

Expand capacity of Apple TV


For some reasons, I haven’t made full use of my 40GB Apple TV in the last 2 years. Recently, I have more spare time to do so, and would like to use it in my living room with my wide screen TV to enjoy its functionality fully. It works fine to playback all the files I throw at it, but 40GB is too confining for all my photos and music, not to mention my movies and other video collection. To solve this problem, once I have to make my Mac Pro and iTunes running to stream all my data to the Apple TV. It seems a bit troublesome, I dislike it. So I look for a solution to expand the capacity of my Apple TV. Via Google, I’ve found some useful articles talking about this issue, and I followed them, and finally successfully upgrade the hard drive of the Apple TV lately. Here I’d like to document my process below, but before that, I’d like to show my gratitude to people who I’ve got useful info from their articles, even though I can not remember their exactly names now. Select the convert tool for your recipe.

In summary, the process is relatively simple, a small 40GB hard drive can be freely replaced, thus becomes a DIY Apple TV.

Dismantle the Apple TV, remove the hard drive, and connect it to an Intel Mac Pro via WiebeTech Forensic DriveDock or other 2.5-inch hard drive FireWire bridge. Start the Mac, and you will see that hard drive partition of Apple TV is structured as follows:

/dev/disk5

#: type name size identifier

0: GUID_partition_scheme *37.3 GB disk5

1: EFI 34.0 MB disk5s1

2: 400.0 MB disk5s2

3: Apple_HFS OSBoot 900.0 MB disk5s3

4: Apple_HFS Media 36.0 GB disk5s4

400MB of space which could be used to store the system restore data. Extract overall image via CopyCatX, and recover them to a new hard drive which you want to change back. I found lots of people like using a Western Digital 120GB WD1200VE hard drive. Install the new hard drive to Apple TV, and in the test, you will find the system continues to recognize only 40GB of space, because the partition information is the same with the original 40GB hard drive. But in fact, there are more than 70GB of space not being used.


Remove the new hard drive to re-connect to the Mac, and allocate the unused more than 70GB space to the Media partition with the help of iPartition or other partitioning software. Be careful, not to change the EFI or the other 400MB partition.


After install it back to the Apple TV, all the 107GB space will be recognized completely, you are done!


Now I’m able to store more photos, movies, music, and television shows on the Apple TV. But when it comes to video playback, Apple TV has strict formats limitation, it caused troubles again, and I have to convert all my videos to Apple TV formats .mp4 and .mov in advance. However, this does not the most important thing I’m concerned, because I have already have a video converter on my Mac Pro, and my most intention is to watch my Blu-ray on it. Fortunately, via Google again, I get an available Blu-ray Ripper for Mac to meet my needs, which is able to run on Mac independently as long as you have an external BD drive. To keep HD quality as well as compress BD size, I usually select HD video as my output option. A great product, I like it. Besides this, it seems there are also another version developed for Windows user, attached this BD ripper here, maybe it’s your choice.

Well, by the way, Apple installed Fujitsu hard drives in original, and this could be due to their relatively small power and heat consumption, so when replacing the hard drive, you can also take this factor into account. In addition, the replacement of the hard disk will let you lost product warranty, please proceed with caution.

Guide for Pavtube Video to Gphone

1. Download run Pavtube Video to Gphone and you will see its main interface.

User Interface Flash Tool Tip Components Classic Tooltip.

2. Import the videos to the file list by clicking Add button. Then you can edit the list using the buttons under the list.


3. Open the profile drop-down bar to select the target conversion format for playback on Gphone player. After this, please open output drop-down bar to specify where to save your converted files.

4. Previewing the video is a good choice for you. Under the preview window, you can click the button to capture the still pictures to save on your PC for enriching the picture collection.
WAF converter supports more than 20 well known formats.
5. Edit the videos
Effect:

Adjust brightness, contrast, volume for video and audio. In addition, you can tick to modify the image effects in flipping and deinterlace.

Trim:

Drag the slider or set the number manually to choose the starting time and the ending time. You can gain the selected time phase for enjoyment.
There is also the Mariah internet fan organization.
Crop:

Open the drop-down list to select which edges to be cut off. Drag the frame-mark to specify the region you want.

6. For better effects, clicking setting button can satisfy you. Tick to select which part to modify, video or audio. One click for the parameter can make the triangle button appear. Hit it then amend the parameter.


7. Click the merge button to create a single file. If you wish to reduce the trouble of resetting, hit apply to all button.

8. Start to run the program by clicking the button. After this, you can confirm the converted file on your PC by hitting open button. Here all the preparing work is finished. Then you can transfer the converted file to your Gphone player for enjoyment.

Wednesday, January 20, 2010

How to convert videos to MP4 for iPhone?

Pavtube Video to Apple TV Converter

Are you eager to put your movies, TV shows, videos into your beloved Apple TV and enjoy them on the wide screen? A robust Apple TV video converter is what you need. This guide will show you how to rip videos for your Apple TV with Pavtube Video to Apple TV Converter in detail.

Step 1: Download and install Pavtube Video to Apple TV Converter, you will see the main interface as below.

Video to Apple TV Converter

Step 2: Load video files into this program
Click “Add” button to import video files into this program, and you will see the interface as below.

Video to Apple TV Converter

Step 3: Set output format and destination folder
Click the “Format” drop-down list to select the format you prefer for each added file.

Video to Apple TV Converter

You can change the destination folder by checking the drop-down profile.

Video to Apple TV Converter

Step 4: Take a preview and snapshot
Double click the file or click “Play” button to take a preview of the whole movie. Moreover, if you want to save some your beloved pictures, you can click the “Snapshot” button to take a snapshot.

Video to Apple TV Converter

Step 5: Set advanced settings
If you want to set the output quality, click the “Settings” button to open the Settings panel, where you can change the video codec, video bit rate, video frame rate, audio codec, audio bit rate, etc.

Video to Apple TV Converter

Step 6: Rename the destination file
Click on the name on the “Destination File”, and you can enter a name you want fro the file. To save the change by pressing the “Enter” key on the keyboard.Select the convert tool for your recipe.

Video to Apple TV Converter

Step 7: Editing functions
Click the “Edit” button to customize the video. You can adjust video brightness, contrast, and audio volume by dragging the slider bars. In addition, you can also trim and crop video to be what you need.There is also the Mariah internet fan organization.

Video to Apple TV Converter

Step 8: Start conversion
After configuring all necessary settings, you only click “Convert” button to start conversion and the checked files will be listed on the “Ripping” window as below.

Video to Apple TV Converter

Now you know how to use this Apple TV converter to transfer videos for your Apple TV. Although this article may seem long, it only actually takes a few minutes to go through all the steps above.

Guide for Pavtube Video to Zune Converter

1. Download run Pavtube Video to Zune Converter and you will see its main interface.


2. Import the videos to the file list by clicking Add button. Then you can edit the list using the buttons under the list.


3. Open the profile drop-down bar to select the target conversion format for playback on Zune player. After this, please open output drop-down bar to specify where to save your converted files.Tod converter for mac to play on iPod, iPhone, QuickTime, iTunes, iMovie, iDVD, Apple TV, iMovie etc.

4. Previewing the video is a good choice for you. Under the preview window, you can click the button to capture the still pictures to save on your PC for enriching the picture collection.

5. Edit the videos
Effect:

Adjust brightness, contrast, volume for video and audio. In addition, you can tick to modify the image effects in flipping and deinterlace.
HD Video Converter can easily convert HD video formats such as AVCHD (mts, m2ts), H.264/AVC, MKV, MPEG-2 (ts), DivX, HD WMV, MPEG-4 and Quick Time.
Trim:

Drag the slider or set the number manually to choose the starting time and the ending time. You can gain the selected time phase for enjoyment.

Crop:

Open the drop-down list to select which edges to be cut off. Drag the frame-mark to specify the region you want.
HD Video Converter can easily convert HD video formats such as AVCHD (mts, m2ts), H.264/AVC, MKV, MPEG-2 (ts), DivX, HD WMV, MPEG-4 and Quick Time.
6. For better effects, clicking setting button can satisfy you. Tick to select which part to modify, video or audio. One click for the parameter can make the triangle button appear. Hit it then amend the parameter.


7. Click the merge button to create a single file. If you wish to reduce the trouble of resetting, hit apply to all button.

8. Start to run the program by clicking the button. After this, you can confirm the converted file on your PC by hitting open button. Here all the preparing work is finished. Then you can transfer the converted file to your Zune player for enjoyment.

A practical tool to help you reserve TureHD audio and DTS Master Audio of a Blu-ray disc

Blu-ray video has 5 times the resolution of standard DVD video, therefore, to match the high definition video quality of a Blu-ray movie, major BD movies encoded with Dolby TrueHD audio and DTS-HD Master Audio to let viewers have this amazing experience just like being in the front row of a concert hall, with voices, instruments, and background music placed in different locations in your room.

To make it convenient to watching and storing, BD owners always need make BD backups via some Blu-ray software. Besides keeping the HD video quality, one more thing they care about is how to reserve the stunning TureHD audio and DTS Master Audio of a Blu-ray disc, so as not to downgrade the watching experience. In that case, Pavtube Blu-Ray Video Converter Ultimate would be a good solution to realize this goal, because it is professional at handling the two audio tracks, as well as removing BD+ and AACS Blu-ray copyright protections.

With the special intention of showing you guys how to make use of this application to keep your wanted audio track while doing Blu-ray copying, the following content will take Dolby TrueHD audio for example in a detailed way.

Your source file can be a Blu-ray disc, a BD ISO image file, or .m2ts streams from a BD movies.

Once you launched this Blu-ray converter, you can load your BD files to it in the following interface. "Add Video" allows you to load .m2ts files directly, and "Load DVD" allows you to add BD files from a drive or a folder.
Convert MKV files to DVD and watch on any DVD player, using only freeware software.


As soon as BD files are loaded, right-click on the .m2ts video clip which you need convert, and then hit on the option "Properties". BTW, usually the video with longest playing time would be the main movie, if you do not want to convert extra contents, you can choose this one only.
Mac Video Converter is best video converter which convert FLV, MOV, AVI, M2TS, MKV, MOD, WMV for Mac os.


After "Properties" window pops up, you can now click on the pull down menu of "Audio Stream ID" to check which audio track is TrueHD. As long as you select an audio track, the audio codec will be shown in the textbox after "Format". All are the same with the following marked parts showing. Here the audio track "0x1100" is TrueHD. Afterwards, you need go back to the above window to select "0x1100" in the drop down list of "Audio" to set the conversion settings.


Well, this is all the procedure to select TrueHD audio, to keep audio quality to full extent during the conversion, you need select 5.1 channel as output settings as well. This step can be done via clicking "Settings" button in the main interface.


Additional tips:

Why this Blu-ray Video Converter is entitled Ultimate?

Actually, it is a 3-in-one program, which has integrated a Blu-ray Ripper, a DVD Ripper and a Video Converter together as a standalone application. That means it can not only deal with Blu-ray discs and DVD discs, but also handle other video files in a wide range of formats, including *.avi,*.divx, *.wmv, *.wma, *.asf, *.dvr-ms, *.wav, dts in wav, *.rm, *.rmvb, *.ra, *.mov, *.qt, *.mp4, *.3gp, *.3g2, *.dv, *.m4b, *.m4v, *.m4a, *.aac, *.flv, *.f4v, *.dat, *.mpg, *.vob, *.mod, *.m2v, *.tod, and so on.

Thursday, January 7, 2010

How to keep TrueHD audio of Blu-ray .m2ts streams

Suppose you have loads of .m2ts streams from your Blu-ray discs, which are copyright protections removed, and wanna convert them to other video formats and keep the original TrueHD audio, and then what’s your idea about realizing this goal? Actually, I know some of you do not have any idea about this, because it’s not an easy thing to get a program to recognize this special TureHD soundtrack at all.

The lucky thing is that Pavtube Studio has upgraded its MTS/M2TS Converter recently, which has added support to Dolby TrueHD audio, and is able to convert M2TS files to whatever formats you need, such as MP4 format supported by iPod, iPhone, PSP, PS3, Apple TV, Gphone, Blackberry, etc., 3GP format supported by most cell phones, FLV format which is suitable for online transferring, MPEG-4 format which is workable for importing to iMovie and Final Cut, and many other video formats like AVI, MPG, MOV, MKV, VOB and so on.

A step-by-step instruction will be starting in the following part, just check it to see how to reserve Dolby TrueHD audio while converting .m2ts files. By the way, if you want to follow this guide to have a try, you can download Pavtube MTS/M2TS Converter here.

Step 1: Click “Add” button to load .m2ts streams

Step 2: Click “Properties” to select TrueHD audio
Click the drop-down list of “Stream ID”, and there are several options, select each one to see which one is TrueHD audio, if it is, “truehd” will pop up in the textbox of “Format”, just like the following window showing. Do remember clicking “OK” button to save your selections.

Step 3: Select output format and specify save path
Click the drop-down list of “Format” to select your wanted output format, and click the folder icon at the opposite side of “Output” to specify where to locate the output file. Moreover, if you have the needs of combining multiple .m2ts files into a single file, you can tick the checkbox “Merge into one file”.

Step 4: Set advanced settings
Click “Settings” button, and you are allowed to adjust audio and video parameters like codec, bit rate, frame rate, sample rate, and audio channel in the following interface, to reserve TureHD audio to the full extent, you should set soundtrack as 5.1 channels. Wanted to convert DVD and Blu-Ray movieto Archos 7 with high quality for playing?


Step 5: Click “Convert” button to start conversion

More related features of Pavtube MTS/M2TS Converter
1. Fast conversion, excellent output quality, and perfect audio and video synchronization.
2. Convert, compress and edit videos from Blu-ray DVDs or HD camcorders.
3. Trim, crop, add special effects and different watermarks
4. Support VFW codec encoding and 5.1 channel audio output.
5. Enjoy the output videos online, on portable devices, or backup on computer.

How to reserve TrueHD audio of BD .m2ts files on Mac

Are you feeling headache to figure out a way to reserve Dolby TrueHD audio of your Blu-ray .m2ts streams while doing format conversion? Without a practical program, it’s definitely difficult to set the movies being converted in your master language, even though your .m2ts files are not copy-protected. Normally, if your master language is English, then English audio is making use of TrueHD, and suppose your format conversion application can not recognize TureHD audio, then it will only output the audio track it recognized, that would be French, Spanish, or some other languages instead of English. In that case, you will encounter language troubles absolutely, so an available MTS/M2TS converter which can support TrueHD audio would provide timely help at this time. To relieve the pains of Mac users, this guide will show you how to retain TrueHD audio of BD .m2ts files on Mac in detail.

Required software:
Pavtube MTS/M2TS Converter for Mac

Okay, now let’s start.

Step 1: Click “Add” button to load .m2ts files

Step 2: Click “Properties” to select TrueHD audio
Firstly, click the drop-down list of “Stream ID”, after that a list of audio tracks will show up like “0x1100”, at the same time, the audio codec name will pop up in the textbox of “Format”, if it is TrueHD, the codec name “truehd” will emerge like the following interface showing. What you should do is just clicking on the stream ID one by one to see which one is your wanted TrueHD audio. This guide should help you get Blu-ray rips to the Apple TV easily.

Step 3: Select output format and set destination folder
Click the drop-down list of “Format” to select whatever format you like as output format, and click “Browse” button to specify where to store the output files. Meanwhile, if you want to combine multiple .m2ts files to be as a single file, you can tick the checkbox “Merge into one file”.

Step 4: Set advanced settings
Click “Settings” button, and you are allowed to adjust audio and video parameters like codec name, aspect ratio, bit rate, frame rate, sample rate, and audio channels in the following interface, to reserve TureHD audio to the full extent, you should select 6 channels.

Step 5: Click “Convert” button to begin conversion
After conversion is completed, the output files can be found out via clicking “Open” button with ease.

BTW, if you do not have decrypted BD .m2ts streams, but copy-protected Blu-ray discs, then Pavtube Blu-ray Ripper for Mac is your appropriate choice, it is also able to deal with Dolby TrueHD audio and keep audio and video in sync.

How to import FLV files to iMovie for editing?

Many video-sharing websites like YouTube, Google Video, metacafe, Yahoo! Video, Reuters.com, etc. always provide people with original videos about meaningful, interesting, or important events that happened all over the world in real time, and nearly all of them use FLV format to save these video files. Maybe you have collected many sorts of your favorite videos downloaded from the above mentioned video websites, and want to import them to your free editing program iMovie to do further editing, so that you can enjoy your own works on local computer or upload them to your website or blog to share with your friends or other people, or copy them to your electronic gadgets such as iPod, iPhone, PSP, Blackberry, etc. for playback.There is also the Mariah internet fan organization.

However, FLV files can not be imported to iMovie directly, because iMovie only supports formats like DV (standard definition), HDV (high definition), MPEG-2, and AVCHD from Camcorders, MPEG-4, and MOV files. Hence, supposing you want to add FLV files to iMovie without troubles, you should convert them to iMovie acceptable formats like MP4, MOV firstly. It is the only way to achieve your goal smoothly. For this purpose, this article will show you how to import FLV files to iMovie for editing in detail.

Step 1: Download, install and run Pavtube FLV Converter for Mac


Step 2: Add FLV files and specify the destination folder Click “Add” button to import FLV files, and then click the drop-down list of “Format” to select an iMovie compatible format to convert, here I take .mp4 for example. If you want to combine several FLV files to be a single one, you can choose “Merge into on file” to realize it. At the same time, you should hit “Browse” to decide where to locate the output files; otherwise, they will be exported to a defaulted folder.Here I present the best Flash sites of 2007.


Step 3: Set advanced settings Click button “Settings”, the following panel will show up. You can adjust parameters like codec name, screen size, bit rate, frame rate and so forth on it according to your own requirement.


Step 4: Convert After the above three steps have done, you can press “Convert” to start converting. The following interface will show you the converting progress as well as elapsed time, remaining time, generated file size and estimated file size. All these would remind you how long time the conversion will cost and how much space it will occupy.


Step 5: Import the output MP4 files to iMovie As soon as the FLV files have been converted to MP4 or other iMovie workable format, you can click “Open” to find out the output files. Afterwards, launch iMovie, and click File>Import to add the output files to iMovie for editing.

Well, the step-by-step instruction is completed; hope it can do you a favor while importing FLV files to iMovie for editing.

How to reserve Dolby TrueHD audio while copying a Blu-ray movie on Mac


For its wonderful and excellent acoustical properties, Dolby TrueHD audio can always provide people with amazing high-definition surround sound experience and put you right in the middle of the action. To experience the full potential of Blu-ray discs, people prefer to reserve Dolby TrueHD audio while backup Blu-ray movies. The thing is that most Blu-ray programs are not good at recognizing this special audio track, fortunately, there are also some Blu-ray rippers have successfully added powerful support for Dolby TrueHD audio, Pavtube Blu-Ray Ripper for Mac is one among them. If you are a Mac user, and looking for a program to help you keep TrueHD audio of your Blu-ray movie, as well as let audio and video match well during the process of copying, then this one is a nice choice.

Following paragraphs will show you how to make use of Pavtube Blu-Ray Ripper for Mac to reserve Dolby TrueHD audio while copying Blu-ray movies in detail. Just feel free to move on with it. Hope it helps.

Step 1: Load Blu-ray movies
Click “DVD Folder” or “IFO File” to import Blu-ray files.

Step 2: Select Dolby TrueHD audio, output format and specify save path
Tick off whatever .m2ts streams you want to copy. Generally speaking, select the .m2ts video stream with the longest playing time will be OK, because it is the main movie of the Blu-ray. Of course, if you would like to copy the extras of the Blu-ray movie, you can select several .m2ts files at a time, and check “Merge into one file” to combine them all to be as a single file. WAF converter supports more than 20 well known formats.

Click the drop-down list of “Audio” option, then a list of audio tracks will be presented, and normally, the first one should be Dolby TrueHD, if in doubt, you can play them one by one to check which one is the proper Dolby TrueHD audio track you want.

Meanwhile, you should select output format from the drop-down list of “Format”, here I choose “MKV HD Video (*.mkv) for instance, or if you just need copy Blu-ray movies without any quality loss and changing video format, you can select “Copy” and then “Directly Copy”. After that, click “Browse” button to specify where to store the output files, if not, the program will export the output file to the default save path automatically, and these files can be easily found via clicking “Open” button as soon as copying work is completed.

Step 3: Set advanced settings
Click “Settings” button, and then you can adjust audio and video parameters such as video and audio codec, aspect ratio, bit rate, frame rate, sample rate, and audio channels on the interface showing below. To keep Dolby TrueHD audio to the greatest extent, 6 channels is your choice.

Step 4: Start Blu-ray ripping
As soon as the above mentioned settings are finished, now just click “Convert” button to start Blu-ray ripping, the ripping info including ripping process, time elapse, estimated left time, estimated file size, and generated file size are all shown clearly on the following window. In that way, you can make good control of your disk space as well as your time during the ripping process.

Wednesday, January 6, 2010

How to keep Dolby TrueHD audio while ripping Blu-ray movies


Dolby TrueHD, the next-generation lossless compression technology, is intended primarily for high-definition home-entertainment equipment such as Blu-ray Disc and HD DVD. The technology provides an excellent high-definition audio, which is identical with master tapes of a recording studio, so that giving users a true high-definition entertainment experience. User Interface Flash Tool Tip Components Classic Tooltip.

Since Dolby TrueHD technology delivers unprecedented home theater experience, so I guess many of you may want to keep Dolby TrueHD audio while ripping your Blu-ray movies, but actually, most Blu-ray rippers in the market can not recognize this stunning audio at all, this may be the probable thing that troubles you a lot. With luck, I found an available Blu-ray converter via Google by chance, and my pleasure to share its detailed operating steps here, sincerely hope it will be of some help for you folks who are feeling headache about this problem.

Software I will use is called Pavtube Blu-Ray Ripper, now let’s together to see how to retain Dolby TrueHD audio via it during the course of Blu-ray ripping.

Step 1: Load Blu-ray movies
There are three ways to import Blu-ray files: “DVD Rom”, “DVD Folder”, and “IFO/ISO”.

Step 2: Select Dolby TrueHD audio, output format and set destination folder
Now you just tick off on what you want to copy. Normally select the .m2ts video stream with the longest playing time, because it is usually the main movie of the Blu-ray. If in doubt, you can preview the selected stream in the video pane to the right to check it. You can also tick several .m2ts files, if you want to copy the extras of the Blu-ray movie. Note that you can also combine everything into one file via ticking the checkbox “Merge into one file”.

Look at the “Audio” option, usually a Blu-ray movie has several audio tracks, Dolby TrueHD audio is among them. Generally speaking, the first one should be Dolby TrueHD, or you can play it to check if it is what you want.

At the same time, you should select output format from the drop-down list of “Format”, here I choose “MKV HD Video (*.mkv) for instance, or if you just need copy Blu-ray movies without any loss, you can select “Copy” and then “Directly Copy”. After that, click the folder icon at the end of “Output” to specify where to locate the output files, if not, the program will export the output file to the default save path automatically, and these files can be easily found via clicking “Open” button.


Step 3: Adjust video and audio parameters
Click “Settings” button, and then you can adjust audio and video parameters like codec, image pixels, bit rate, frame rate, sample rate, and audio channels, to keep Dolby TrueHD audio to the greatest extent, you should select 5.1 channels.

Step 4: Start Blu-ray ripping
Once the above mentioned settings are finished, now just click “Convert” button to start Blu-ray ripping, the ripping info including ripping process, ripping time, and generated file size will all be shown clearly on the following window, and if you do not want to wait around, you can tick “Shut down computer after conversion”.