Basically, Pavtube iMedia Converter helps you to directly backup DVD and blu-ray movies from disc and folder to hard drive, rip DVD ISO image file to desired video and audio formats, convert HD footages such as MTS (M2TS, M2T), TOD, MOD and MOV files to desired formats for editing and playing back, convert DVR TiVo files to lossless MPEG files and other desired formats, and convert among other common videos such as flash videos, Quicktime videos, CD files, digital video files, Matroska files, etc. and extract audio tracks from the source discs and clips. Besides, the converter features editing facilities such as trimming, cropping, watermarking, flipping, etc.
To learn more information about this app, you may visit iMedia Converter for Mac or download the free trial of iMedia Converter and try it out. Please note that the trial version output video with a watermark on the screen and the Disk Copy option is restricted to use three times only.
Now let’s see how to use the powerful iMedia Converter for Mac.
Import source disc/ folder/ file
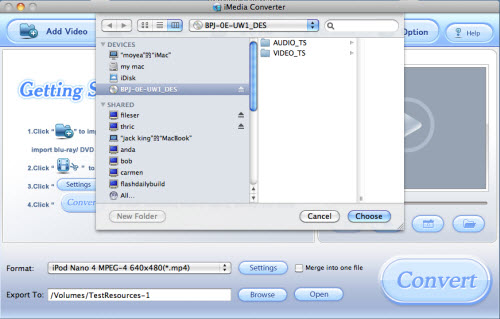
Accepted sources includes blu-ray disc, blu-ray folder, DVD, DVD folder, DVD ISO image file, and Video clips. For ripping blu-ray disc you need to connect an external BD drive with your Mac. To add video files, please click ‘Add Video’ button and browse to source video files or drag and drop the files in the ‘Getting Started’ area. To load blu-ray disc, DVD, blu-ray folder, DVD folder, please click ‘DVD/ BD Folder’ and browse to the disc or directory. To import DVD image file, please click ‘IFO File’ and browse to the file you’d like to convert.
The file list is composed of five columns: Check box, Name, Duration, Trimmed Length, and Destination File.

Check Box: Click to check/ uncheck all files in the list.
Destination File: The name of the converted file. By default it is same with the original file. If you’d like to specify a different name for output file, double-click it in Destination File column and type in favorable name.
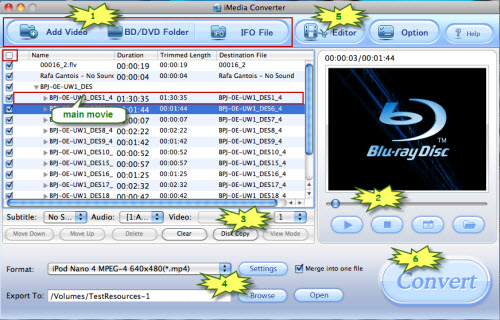
Common video files are listed for you to organize; the blu-ray or DVD movie shows up as a directory. Expand the directory and you will find all the chapters are in numerical sequence. You can convert the whole disc to movie collection or select single chapter for conversion. An excellent MKV Converter for Mac OS X software to convert MKV video on Mac.
For blu-ray movie, there are Title Mode and File Mode. By default the files are listed in Title Mode, all the chapters are in numerical sequence for you to check individually. For checking the subordinate chapters of certain sequence, please click its plus sign. Generally, ‘Title001’ contains the main movie, and other Titles are commentary, menus, titles and ads. By default all the Titles are selected for editing and ripping. If you want to rip the main movie and nothing more, do uncheck other sequences. If you would like to retain everything in the blu-ray disc, simply use the default settings. If you’d like to switch to file mode, please select the blu-ray movie directory and click ‘ViewMode’. And you can check and preview each individual segment. In File mode all the m2ts files in file list are checked by default. If you want to select but the main movie, a fast way is to right-click and choose ‘Uncheck All’ in shortcut menu and then check the main movie (longest m2ts file). Or simply check the small box in the title bar of the file list to check/ uncheck all.
When a blu-ray or DVD movie is loaded, you can find the Subtitle and Audio option under the file list are activated.

Subtitle: Click to view available subtitles of selected chapter and set desired subtitle from drop-down list. Note that some chapters have no subtitles at all. And you can specify subtitle of different languages for different chapters.
Audio: Click to view available audio tracks selected chapter and set desired audio from drop-down list.

No comments:
Post a Comment