Thursday, June 24, 2010

Best DVD to iPad Converter for Mac - Mac DVD to iPad Converter reviews

So there are hundreds of movies in your DVD collection, wanna rip DVD on Mac for playback on your new iPad or iPad Wi-Fi+3G in 720p quality? If so, this Mac DVD to iPad Converter Reviews will show you how to convert DVD movies for watching on your iPad with excellent quality. Go to find the details from the following paragraphs.


Part 1. Only rip DVD to iPad on Mac


The software you will need is Pavtube DVD to iPad Converter for Mac.


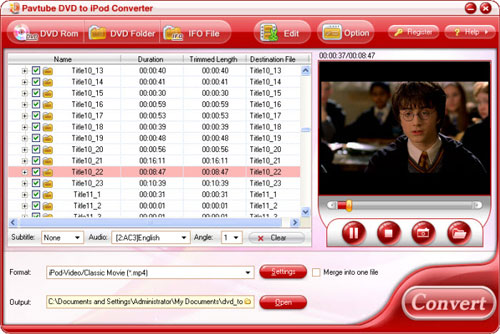
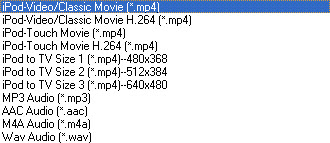
Pavtube DVD to iPad Converter for Mac is capable of ripping common and protected DVD movies into video and audio formats that are compatible with iPad and many other devices. The software outputs optimized H.264 and MPEG-4 encoded MP4 up to 720p and versatile audio formats (MP3, AAC, WAV, lossless FLAC, AIFF, etc) for iPad.


System


- Processor: 1G Hz or above PowerPC G4/G5 or Intel processor.

- Operating System: Mac OS X (including Mac OS X 10.4 Tiger ,v10.5 Leopard and v10.6 Snow Leopard ) on iMac, MacBook, Mac Pro, etc.

- Memory: 512 MB physical RAM (memory) or more.

- Monitor: 1024*768 or higher resolution display.

- Optical Drive: DVD-ROM or rewritable DVD drives.


Offical Guide


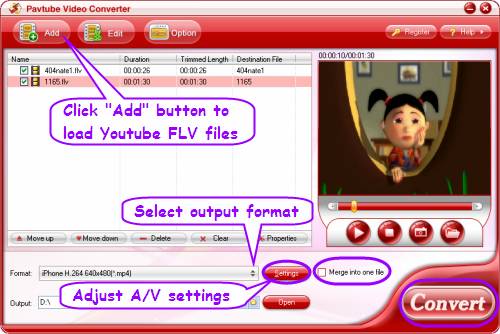
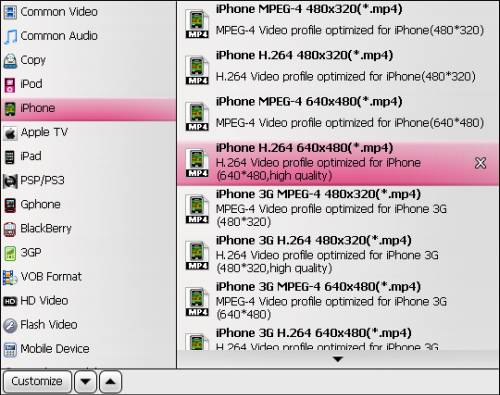
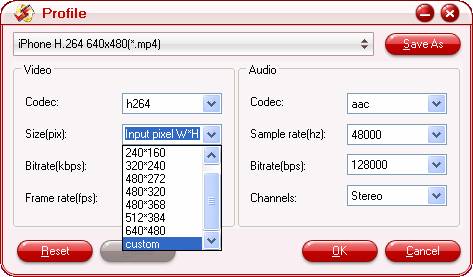
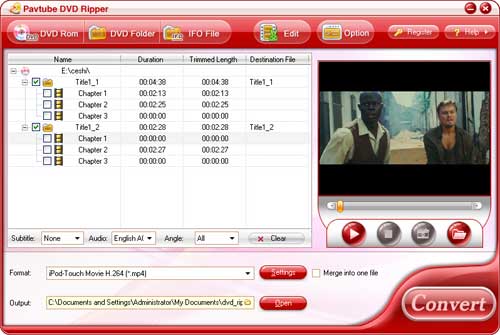
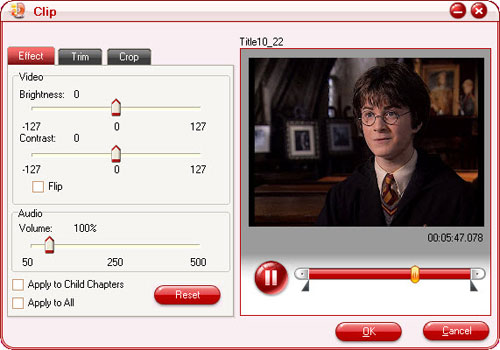
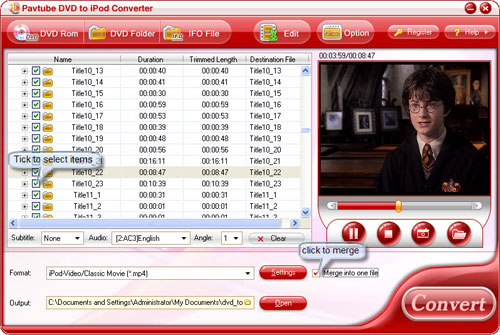
How to use Pavtube DVD to iPad Converter for Mac?


Note: If you are Windows user, Download Windows DVD to iPad Converter here.


Part 2. rip Blu-ray to iPad on Mac, rip DVD to iPad on Mac, Convert video movies to iPad on Mac, 3-in-1


The software you will need is Pavtube iMedia Converter for Mac.


Pavtube iMedia Converter for Mac is an all-in-one Mac Blu-ray & DVD ripper and Video Converter. It helps you back up or rip blu-ray disc and DVD (ISO image file included), no matter encrypted or non-encrypted, and convert videos of all popular formats to your hard drive for playing with. iMedia Converter supports conversion for all popular mobile players and devices such as iPod, iPhone, iPad, Apple TV, Xbox, PS3, Zune, Archos, PSP, 3GP, Blackberry, Droid, Nexus One etc. It also converts HD video footages from Cameras and Camcorders to common video and editable HD video format for non-linear editing software like iMovie, Final Cut Express, Final Cut Pro, Final Cut Studio, Avid, Adobe Premiere etc. and extracts audios from blu-ray disc, DVD and video with high conversion speed.


System

- Operating System: Mac OS X 10.5 above (including Mac OS X 10.5 X Leopard,Mac OS X 10.6 Snow Leopard) on iMac, MacBook, Mac Pro, etc.

- Memory: 512 MB physical RAM or above.

- Processor: Intel processor.

- Monitor: 1024*768 or higher resolution display.

- Optical drive: External BD drive for ripping blu-ray disc.


Offical Guide


How to use Pavtube iMedia Converter for Mac?


Note: If you are Windows user, Download Windows iPad Converter Ultimate here.


Via: Home-Media-Center.net Recently Announced Best Mac DVD to iPad Converter Review

Focusing on 2010 World Cup South Africa – download your favorite highlights from Youtube


There is no other global sporting tournament that commands the attention of the football World Cup. So as the opening game of the World Cup tournament in South Africa draws ever nearer, the event has catch-all ardent fans prepare to cheer on players they've booed all season at club level. The massive attention the World Cup garners brings tons of excellent video clips on Youtube and other online video hosting sites. And some of them are absolutely worth of collecting. This guide tells you how to download those favorable videos for collecting with Pavtube Youtube Converter, the most user-friendly online video capturing tool.


A step-by-step guide of downloading World Cup videos from Youtube:

Download and install the trial version of Pavtube Youtube Converter. Run the application and it pops up an interface (Video Detector) shows as below:


1. Type www.youtube.com in address bar, click ‘Go’ and the browser will jump to the home page of Youtube. Input the keywords (e.g. ‘world cup 2010 highlights’) in search field and click ‘Search’ button to view the results.


2. Choose a video and play, the URL of current playing video will be detected and displayed in URL list.


3. Select the video you would like to download in the Detected URL List.


4. Click Download button (or double-click the selected file).


5. Now a New Download window pops up and you need to configure download settings in the window. Input a desired name in "Save as" box, click "Browse" and specify a folder where you would like to save the video and determine to put it to "Movie" or "Music" sort under "Library". The videos are usually *.flv files. If you would like to convert them to other formats, please check the box of ‘Convert to video’ and set output desired format. Finally click "OK" to confirm your configuration.


6. Once you click "OK" to confirm, the Downloader starts to work. You could click "Stop" to cease downloading and "Delete" to cancel this task when the file is downloading, File name, size, completed time and view log are displayed in task list for your reference.


7. Wait till the task completes and a Complete prompt box show as follow. The Complete prompt box indicates successful download of selected video file. Click "Open" button to open downloaded video file, ‘Explorer’ to open the folder where it saved, "Close" to close the prompt box. If you check "Never show again", this box will never appear again.


8. You may also click "Downloaded" and find the video in file list, select it and click "Play" button of the toolbar to watch the downloaded video.


You may also convert the videos to multiple video and audio formats for your portable devices like iPod, iPhone, Droid, Gphone, etc. Simply switch to "Converter" and click "New" to add the videos and specify output formats, then click "OK" to start conversion. After the conversion you may click "Locate" to find converted video or "Play" to view it.


Learn more: http://www.pavtube.com/2010-world-cup/

How to convert YouTube FLV files to iPhone, iPhone 3G, iPhone 4G compatible formats


Have you downloaded loads of your beloved video files from YouTube? If so, what’s your commonly used way to play them back? Watch them on your PC, or experience them on your handheld devices like iPhone, iPhone 3G, iPhone 4G? Since Apple has strict format restrictions, the FLV files downloaded from YouTube or other video sharing websites such as Metacafe, Dailymotion, and Yahoo! Video are unplayable on its portable devices like iPod, iPhone, even the new released iPhone 4G. The good news is that Pavtube Video to iPhone 4G Converter will absolutely do you a favor on this side, so that you can successfully watch YouTube FLV videos on your iPhone, iPhone 3G, and iPhone 4G whenever and wherever you want. Please feel free to read this tutorial to get a solution on how to convert YouTube FLV files to iPhone, iPhone 3G, iPhone 4G compatible format.


HOW-TO:

1. Download, install and run this YouTube to iPhone converter.

Once you launch it, click “Add” button to import your downloaded YouTube FLV files to this program.


By the way, this FLV to iPhone converter supports batch conversion, so you can add multiple FLV YouTube files to it at a time. If you’d like to combine several files into a single file, you can tick off the checkbox “Merge into one file” to realize this goal, so that there are no intervals when you play them back on your iPhone, iPhone 3G, or iPhone 4G.


2. Select output format for iPhone, iPhone 3G, or iPhone 4G

Click on the drop down list of “Format”, and then hit “iPhone” preset, after that you will see there are different types of formats specially designed for iPhone. Which one to choose is totally depending on your own needs.


3. Customize audio and video parameters

If you do not want to use the default settings, then you can click “Settings” button to enter the following interface, all the parameters shown on it are changeable, including codec, size, bitrate, frame rate, sample rate and audio channel. For example, if you wanna set a higher aspect ration 960*640 for your iPhone 4G, you can click “custom” to input your needed pixels.


4. Start converting YouTube FLV files to iPhone compatible format

Click “Convert” button to begin converting FLV files to iPhone, iPhone 3G, or iPhone 4G workable formats. This YouTube to iPhone converter will finish conversion at a super high speed with excellent output quality, which will never let you encounter audio and video out of sync issues. As soon as the conversion task is completed, you can click “Open” button to get the final files for your iPhone effortlessly. What you need to do next is just syncing videos to iPhone with iTunes. Have fun.


Learn more: http://www.pavtube.com/ipad-ipod-iphone-tools/convert-youtube-flv-to-iphone-iphone-3g-iphone-4g.html

Sunday, June 20, 2010

How to rip DVD movies to your portable devices like iPod, iPhone, Zune, PSP, BlackBerry, etc?

Supposing you have quite a lot of DVD movies, what would you like to do with them? You must have choices such as local playing them with your computer, using DVD players for direct playback via your wide screen TV, or ripping them for backup with another blank DVDs. Have you ever thought of loading some of the DVD clips which are attractive enough into your portable devices like iPod, iPhone, Zune, PSP, BlackBerry, etc. so as to enjoy them during your staying time at bus stop or airport, or sharing them with your friends, or something else? If so, this article will show you clearly how to rip DVD movies to your various sorts of portable devices step by step, and both Windows and Mac users can find out a solution here.


Part 1: For Windows users-How to rip DVD movies to your portable devices?


Step 1: Download, install and launch Pavtube DVD Ripper


As soon as you run this program, the following interface will appear:


Step 2: Import DVD, select output format for your portable Devices and set destination folder


There are three ways to import DVD files, namely through pressing "DVD Rom", "DVD Folder", or "IFO File". After importing the DVD files, now click the drop-down?list of "Format" to select a video format for your mobile devices. The output formats are all listed below, and just make a choice according to the types or compatible formats of your portable players.


Besides this,you can click the folder icon on the?opposite side of "Output"to specify where to locate the output files, otherwise,

Pavtube DVD Ripper will use the folder set by default.Moreover,if you want to join multiple DVD chapters to?be one file, you can check "Merge into one file" to realize it.


Step 3: Set advanced settings


This converter allows you to adjust video and audio parameters, including video codec, bit rate, frame rate, aspect ratio and so on. Generally speaking, the larger inserted values will produce the better video quality, while the file size will be enlarged.


Step 4: Convert


After you set all the settings, you can click "Convert" to start conversion. Once the conversion is completed, you can click "Open" to find out the output files.


Tips: Some more editing functions you may need:


Select a file, and click on the "Edit" button, and then you can change the video and audio effect directly.


1.Effect: adjust Brightness, Contract, Audio volume, etc.


Drag the slider bar of Brightness, Contrast, and Volume to change the effect,at the same time,you can preview the effect?on the right pane.If the DVD image does not display correctly,you can tick?the checkbox "Flip" to get it right. When you find the effect is better after changing the settings, you can choose to apply the effect settings to other files.


2. Trim: choose video duration time


Click on the "Trim" tab,and you will face the window below.Enter the time?point for the start time and the end time.You need click the "Apply" button after changing; otherwise,the change will not be valid. Alternatively, you can drag the slider bars to change the start time and end time.


3. Crop: cut off black edges or the unwanted part of your video


Click on the "Crop" tab, and you?can change the image pixels in the following window.Select an option under the?drop down list of the "Letter Box",drag the dashed frame on the preview pane, or enter value into the boxes of the?four positions to set the pixels you want to cut off.If the file you select to customize is a title, you can tick the checkbox of "Apply to Child Chapters" to get other files with the same settings.


How to convert DVD to iPod in the easiest way?

iPod has been a must for young people, who cannot go without hit music. Well, have you ever thought about enjoying your favorite DVD movies on the big toy iPod? It costs money to download music or movie from iTunes, while it costs you nothing to enjoy DVD movies on your iPod. Why? There is DVD to iPod Converter which can help you convert DVD movies to iPod video, and thus you don’t need to pay for the movie again. You are free to carry your favorite Harry Porter all around you in such a smart iPod. It is amazing. I am going to show you step by step how to convert DVD to iPod video and then how to transfer the converted MP4 video to iPod.

I am going to take Pavtube DVD to iPod Converter for example, because I am using it. It is easy to use, and has brilliant interface with all the options and buttons well-suited to task.


First, launch the program and import the DVD movie to the files list.


Second, choose an output format and do detailed settings of the profile you have selected.


Third, do customization through cropping the image, trimming the DVD movie and adjust the effects like brightness, contrast and volume etc.


Fourth, if you don’t want to convert the entire movie, you can split the movie into different chapters and choose some of them to merge into one file.


Fifth, hit the big "Convert" button to start converting.

Now that you have got videos for your iPod, the rest of the work goes to transferring the video to iPod.


First, install and launch iTunes, and search Files Lite.

Second, turn on wi-fi

Third, launch files lite and enter your IP address and your monitor port.

Fourth, get your computer wirelessly connected, and add a new network place, take Windows XP for example.

Hit the icon of "Network Place", and execute "Add a network place". Choose a network place and enter the IP address and port (http://<ip>:<port>). Set a name and click "Ok".

Fifth, Double click your newly created Network Place to visit your iPod Touch and drags the videos files in. Voila, it is done. Good luck!

Backup BD movies to the hard drive of Popcorn Hour.


As DVD movies and Internet videos have become increasingly popular, digital entertainment enthusiasts have searched for a way to make the rich media content stored on their PC hard drives and home networks available through their TV. Popcorn Hour is such a powerful utility that designed for meeting people’s this need. For movie resources are various, this article will only focus on how to backup Blu-ray movies to the hard drive of Popcorn Hour without video and audio loss, so that you can archive your BD movies in orders and enjoy them with your families via TV or home entertainment system.


Software you need:


Pavtube Blu-Ray Ripper


Okay, now, let’s start.


1. Download Pavtube Blu-Ray Ripper, install and launch it


2. Import Blu-ray files, select "Directly Copy", and set save path


Load Blu-ray files to this program. There are three ways: clicking on button "DVD Rom", "DVD Folder", or "IFO/ISO". Hit the folder icon at the end of "Output" to specify where to save the output .m2ts files. If you want to play them without intervals, I recommend you to tick checkbox "Merge into one file", in that case, all the chapters will be combine into a single file.


Select "Directly Copy" via clicking on the drop-down list of "Format". In this way, the Blu-ray will be directly copied to the hard drive of your PC without any quality loss, and remained in the format of .m2ts, so that you can enjoy them with your family on your TV or home theater systems via Popcorn Hour in totally full high definition quality.


3. Backup Blu-ray


As soon as the above steps are all finished, you can click "Convert" button to start copying.


After backup work is completed, you can directly connect your PC with TV or HT system via Popcorn Hour to enjoy the Blu-ray movies, or you can copy the Blu-ray backups to the hard disk of Popcorn Hour, which potentially expands the device's capabilities for archiving your movie, video and music collections, to manage them in a proper way, and then play them via TV and other home entertainment system.