
Camcorders capable of shooting video in HD formats are popping up everywhere, and prices are now affordable. However, the issue with this is, generally speaking; the majority of us lack the hard drive space to save out these huge MTS files to disk. One can fill a 60 GB HD camera fairly quickly, and fill a PC’s hard drive even quicker. For those who want to enjoy the high-definition contents on HDTV, the format MTS is very inconvenient, because most home media players do not support decoding this format. Many AVCHD camcorder users are trying to combine multiple HD footage as one file for easier playing and transporting, but to no avail. If you are involved in such kind of issues, Pavtube HD Video Converter is what you need. The powerful converting tool is able to convert AVCHD MTS files and videos of many other HD formats. You can convert MTS to HD video formats (HD MKV, AVI, MOV, TS,etc) for playing back, convert down MTS footage to SD video clips so as to save storage, join MTS files together, and trim out unwanted segments easily with this HD Converter.
Please refer to below how to down-scale and convert 1080p MTS footage to 720p MKV for enjoying on HDTV via media players.
Software you need: Pavtube HD Video Converter
Step 1. Import MTS 1080p footage to the HD Converter.
Run the MTS Video Converter, click“Add”button and browse to the MTS files you’d like to convert.
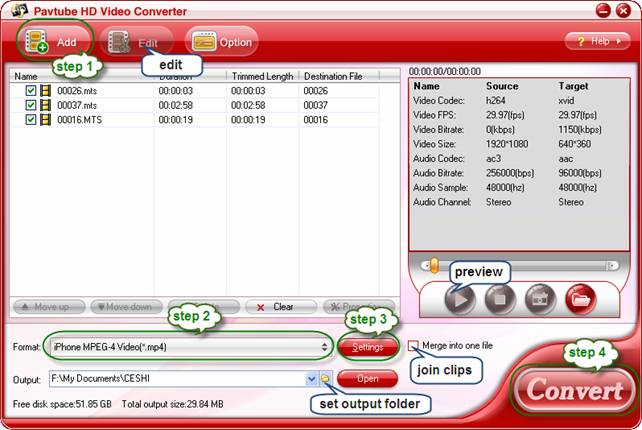
When the MTS files are loaded to the program, you can view the videos from the Preview window. Simply select an item and click the “Play” button. When the video is playing, you may take snapshoot when it plays to your favorable frame by clicking the “Snapshoot” button.
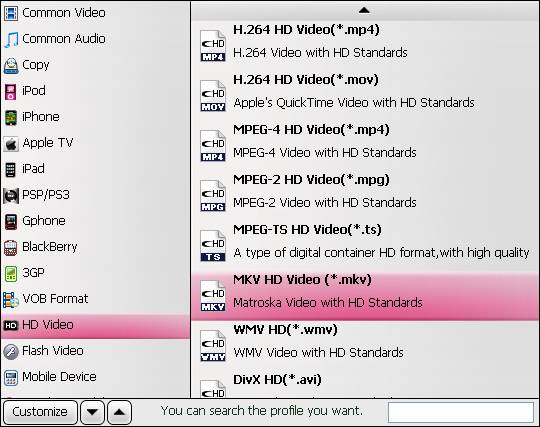
Step 2. Set output format for MTS to MKV conversion.
The MTS Video Converter is capable of converting MTS footage to MKV, MP4, MOV, M4V, AVI and various other optimized formats for media players and portable devices. In order to enjoy the HD recordings on HDTV, you can convert MTS video to MKV. Just click on the “Format” bar and select desired MKV format from the profile list. MTS is a typical HD video format with very high video quality. Meanwhile it takes up much more space than other video formats. If you are unwilling to degrade the HD MTS video quality, “HD Video”-> “MKV HD Video” (*.mkv) is a better choice for you. To save storage, you could follow “Common Video”-> “MKV Matroska Video” (*.mkv). A best solution to balance video quality and storage occupancy is converting 1080p MTS to 720p MKV. You may choose HD MKV format (1080p) first and customize it to 720p HD MKV format.
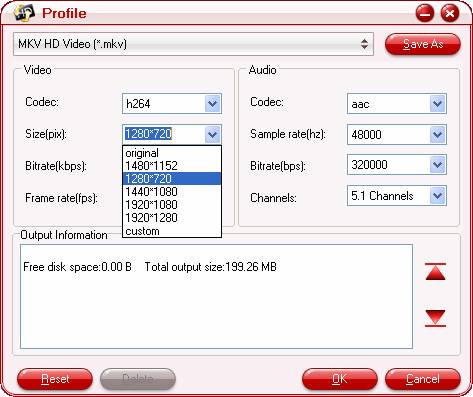
Step 3. Further customize A/ V settings.
To customize video and audio parameters, simply click “Settings” button and enter Settings panel. Find Video Size and set it to 1280*720 instead of 1920*1080. By setting a smaller video bitrate you could reduce the output file size. Another way is to set video codec as “h.264” instead of “xvid”, since h.264 encodes video with higher compress ratio with relative high quality.
Step 4. Start converting MTS 1080p to MKV 720p.
Click “Convert” to start converting MTS to MKV format when everything’s ready. The MTS to MKV Converter supports batch conversion so you may load multiple MTS and MTS files and convert them to MKV at one time. You may also merge them to one file by checking the box “Merge into one file” before conversion starts. After conversion you may click “Open” button to find generated MKV files. After conversion you can transfer 720p MKV file to media players like Western Digital TV player and PS3 for watching on wide screen TV.
Tips:
1. Join and split MTS clips. As mentioned above, you can combine files together by checking “Merge into one file”. To split video and trim off unwanted segments, you may click “Edit” menu, switch to “Trim” tab, and set starting and ending time to include the part you want to keep only, and then leave it to the MTS to MKV converter.
2. Convert 1080p MTS file to 720p MKV with AC3 5.1 sound. Click “Settings” and set Audio Codec Name to “ac3” and Channels to “6” instead of “1” or “2”.

No comments:
Post a Comment