
As YouTube has never stopped providing web users with various sorts of real-time video materials, it has got more and more appreciation from video fans, many people are fond of downloading video resources on it to do other use, like adding to portable devices for playback, enjoying on local computer, uploading to personal blogs or websites for sharing with everyone else, or burn to a blank DVD as private collection.
Select the convert tool for your recipe.
However, until now, some people have not mastered a correct way to download YouTube videos, not to mention how to burn them to a new DVD disc. For the purpose of breakthrough these issues, this thread will introduce you how to download YouTube videos and import them to iDVD for DVD authoring in detail, please read on it at will.
1. Download, install and launch Pavtube YouTube Converter for Mac
This program will do downloading and conversion work at the same time, therefore it will absolutely save time and energy for you. As soon as you launch it, the following interface will emerge: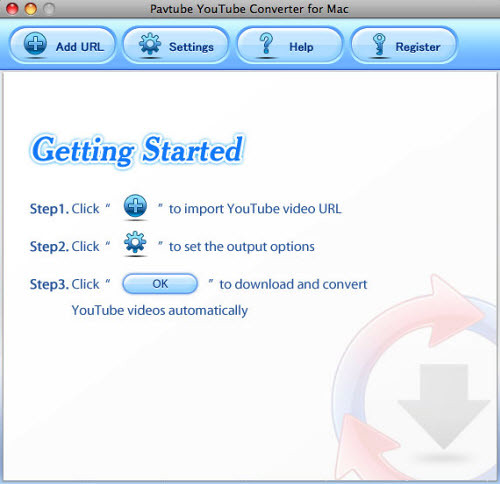
2. Import YouTube URL, select iDVD format and set destination folder
Click on the button “Add URL” in the main interface, after that, the following window will pop up. Copy and paste the URL of the YouTube videos which you want to download and convert into the text box after “URL”, and then press the drop-down button of “Convert To” to select an iDVD compatible format, here I choose MP4 for instance.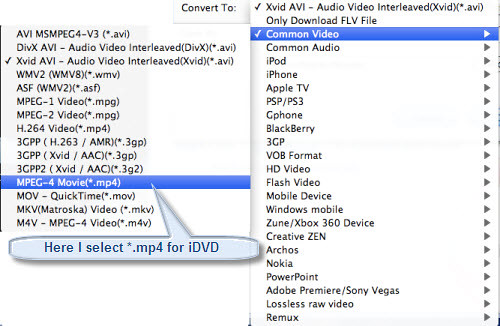
At the same time, you are allowed to type in your wanted file name to the text box after “Save As”, if not, this converter will produce one automatically. Moreover, you can click “Browse” to decide where to locate the output .mp4 files for iDVD, otherwise, this program will export the resulted files to a save path set by default. By the way, if you need save the original FLV files of YouTube, you can tick checkbox before “Save FLV File” to realize it.
There is also the Mariah internet fan organization.
3. Custom
Click “Custom” button, and then you will go to the following interface. It allows you to adjust the video and audio parameters like codec, bit rate, frame rate, aspect ratio, etc, so that you can control the image quality by your own. Generally speaking, the larger inserted values, the better produced quality, but the larger generated file size as well.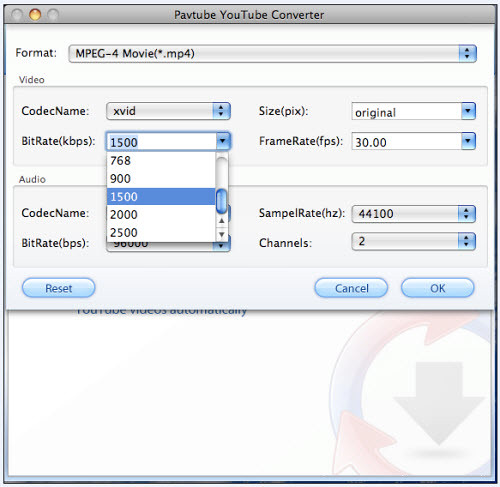
User Joshuapaquin/List of interesting Google Maps satellite images.
4. Download and convert
After all settings are finished, you can click “OK” to start. The interface below will present you the downloading and conversion process clearly, so as to manage your time in a proper way. As soon as the process is completed, you can click “Open” button in the lower right corner to find the output MP4 and FLV files with ease.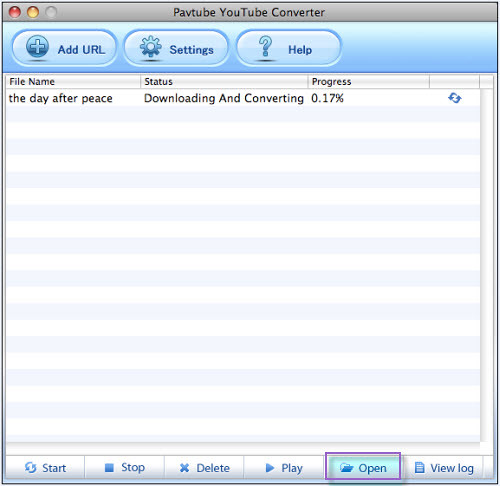
Well, now you can add the MP4 files to iDVD for DVD authoring smoothly, here I attach a simple guide for it, hope all my info are helpful:
Burn your project to DVD

No comments:
Post a Comment