Thursday, September 24, 2009

How to backup Blu-ray movies on HDD of your PC for local playback?


-->

Watching Blu-ray movies has become a popular trend nowadays. Besides directly inserting them to optical drive for playing, many people have the need of copying these movies on HDD of their PC for local playback, so that they can enjoy these movies while traveling without bringing lots of crispy Blu-ray discs. In order to fit people’s requirement, this post aims to introduce you how to backup Blu-ray movies on HDD of your PC via Pavtube Blu-Ray Ripper in detail. Okay, now let’s begin.

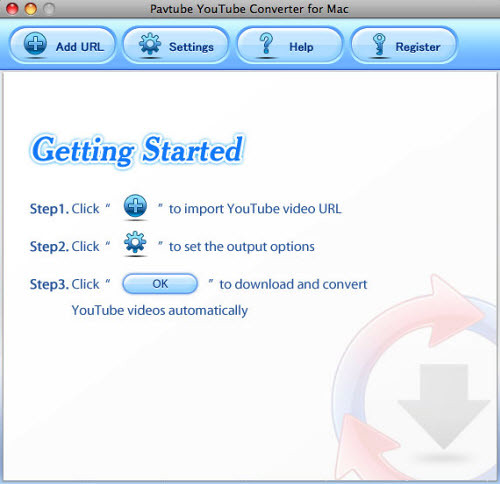
Step 1: Download, install and launch Pavtube Blu-Ray Ripper

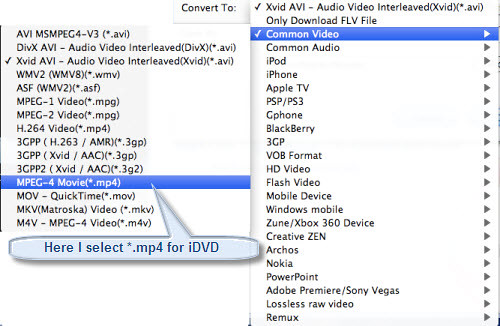
Step 2: Import Blu-ray movie, select output format and set save path
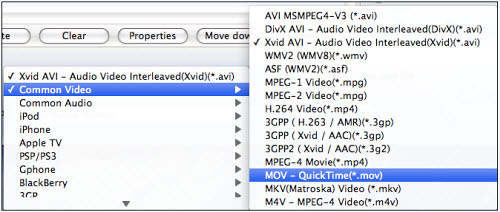
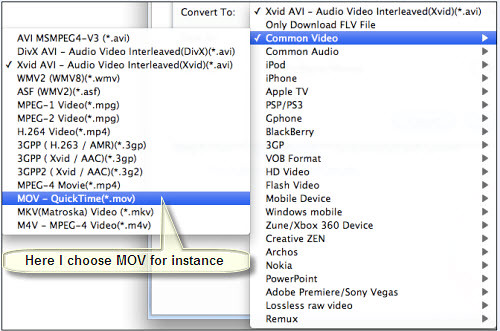
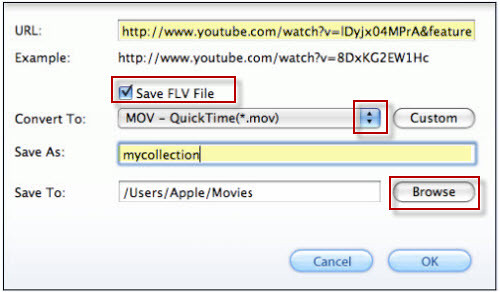
There are three ways to add Blu-ray movie: via “DVD Rom”, “DVD Folder”, and “IFO/ISO”. After importing, you are allowed to select a suitable output format by clicking the drop-down list of “Format”. For the purpose of being supported by Windows well and also keeping the HD quality, here I choose “WMV HD” for instance. Of course, if you want to save space for your HDD to store more Blu-ray movies, you can select a standard output format.Tech help you to research and choose the best nokia cell phone for your needs.

Afterwards, you can hit the folder icon at the end of “Output” to specify where to locate the output files. Suppose you have the demand of combining multiple chapters of you Blu-ray movie to be a single file, you are capable of ticking checkbox “Merge into one file” to complete it, so as to enjoy the backup movie without intervals.

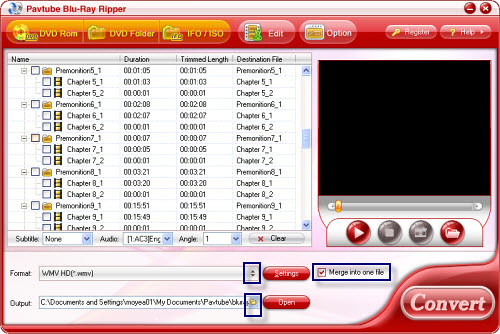
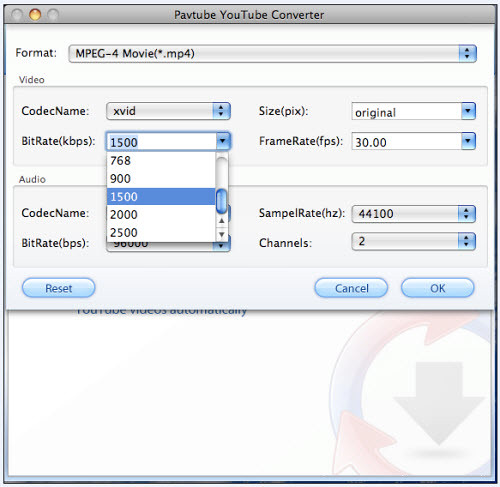
Step 3: Set advanced settings
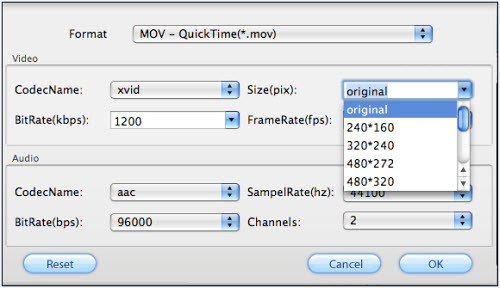
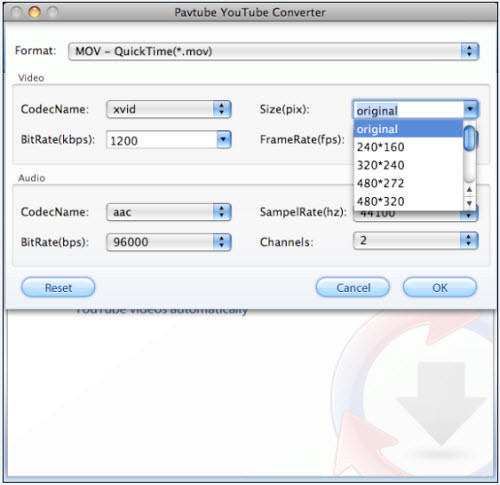
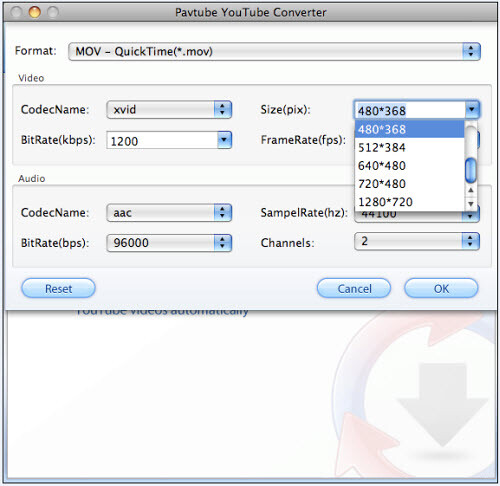
If you want to adjust the video and audio parameters to achieve a special video and audio quality, you can click “Settings” to enter the following window. You are allowed to change items like codec, image size, bit rate, etc to whatever you like. To get a smaller file size, you should select smaller values, of course, there will be video loss; to get a better quality, you should select larger values, while the file size will also be enlarged without doubt. The text edit tool in Adobe Acrobat 8 Professional can be used to mark text in your PDF document.
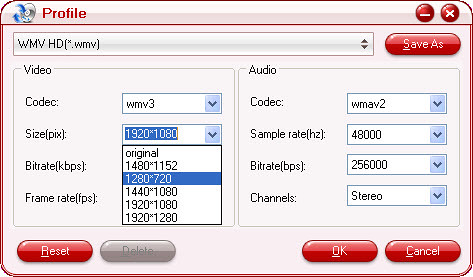
Step 4: Convert
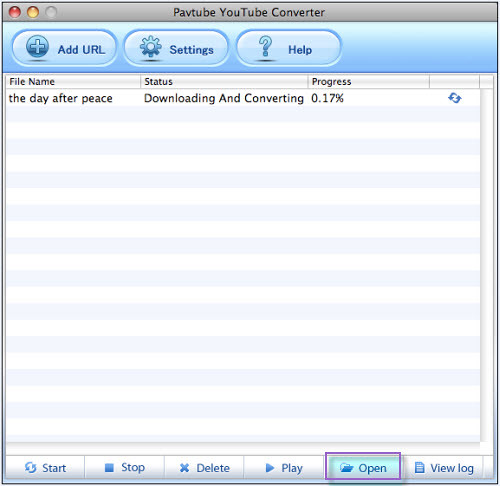
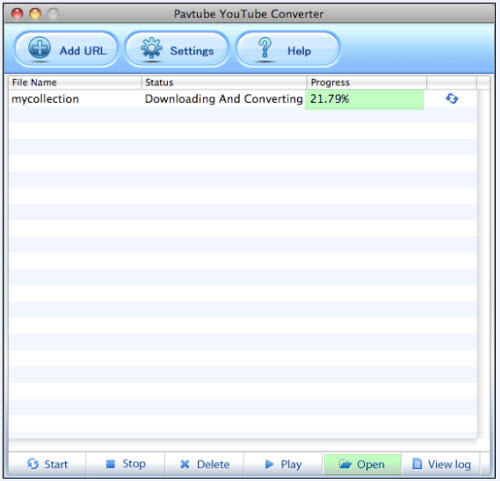
Once the above three steps are finished, you can then click “Convert” button to start conversion, the ripping window is as below. It shows you clearly the conversion process, time elapse, time left, as well as generated file size and estimated file size, so that you can manage your time and HDD in a proper way. Moreover, if you tick the option “Shut down computer after conversion”, you can even go out for a walk or take a nap, or do something else while conversion.

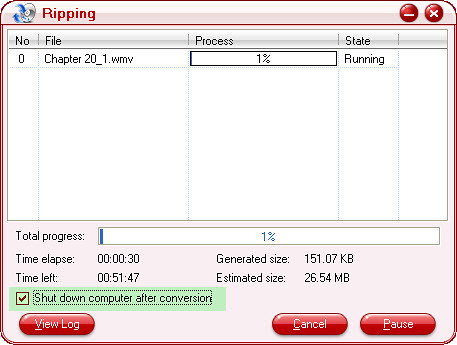
After conversion is completed, you can then click “Open” to find the output HD WMV files originated from Blu-ray movies easily, and then open them with Windows Media Player or other video players for playback on your local PC smoothly.
Welcome to Office Tips, where I provide some examples of the enhanced functionality available.

How to download YouTube videos and import them to iDVD for DVD authoring?


As YouTube has never stopped providing web users with various sorts of real-time video materials, it has got more and more appreciation from video fans, many people are fond of downloading video resources on it to do other use, like adding to portable devices for playback, enjoying on local computer, uploading to personal blogs or websites for sharing with everyone else, or burn to a blank DVD as private collection.

Select the convert tool for your recipe.

However, until now, some people have not mastered a correct way to download YouTube videos, not to mention how to burn them to a new DVD disc. For the purpose of breakthrough these issues, this thread will introduce you how to download YouTube videos and import them to iDVD for DVD authoring in detail, please read on it at will.

1. Download, install and launch Pavtube YouTube Converter for Mac
This program will do downloading and conversion work at the same time, therefore it will absolutely save time and energy for you. As soon as you launch it, the following interface will emerge:

2. Import YouTube URL, select iDVD format and set destination folder
Click on the button “Add URL” in the main interface, after that, the following window will pop up. Copy and paste the URL of the YouTube videos which you want to download and convert into the text box after “URL”, and then press the drop-down button of “Convert To” to select an iDVD compatible format, here I choose MP4 for instance.

At the same time, you are allowed to type in your wanted file name to the text box after “Save As”, if not, this converter will produce one automatically. Moreover, you can click “Browse” to decide where to locate the output .mp4 files for iDVD, otherwise, this program will export the resulted files to a save path set by default. By the way, if you need save the original FLV files of YouTube, you can tick checkbox before “Save FLV File” to realize it.

There is also the Mariah internet fan organization.

3. Custom
Click “Custom” button, and then you will go to the following interface. It allows you to adjust the video and audio parameters like codec, bit rate, frame rate, aspect ratio, etc, so that you can control the image quality by your own. Generally speaking, the larger inserted values, the better produced quality, but the larger generated file size as well.

User Joshuapaquin/List of interesting Google Maps satellite images.

4. Download and convert
After all settings are finished, you can click “OK” to start. The interface below will present you the downloading and conversion process clearly, so as to manage your time in a proper way. As soon as the process is completed, you can click “Open” button in the lower right corner to find the output MP4 and FLV files with ease.

Well, now you can add the MP4 files to iDVD for DVD authoring smoothly, here I attach a simple guide for it, hope all my info are helpful:
Burn your project to DVD


How to download YouTube videos and import them to FCP for editing?


Have you ever encountered troubles while downloading YouTube videos and importing them to Final Cut Pro for further editing? If so, you may find what you want in this article, because it aims to solve the two problems in detailed steps, just feel free to comply with it. Question about new videos on youtube discussion about take part in.

Part one: How to download YouTube videos?
Factually, we can download FLV videos from YouTube via web browser Safari directly. It can be done in several simple steps:
1. Open YouTube.com or other video viewing websites in Safari

2. Open Activity window in Safari by Pressing Command-Option-A, or by selecting “Activity” option in Safari's “Window” menu on the top of the screen.

3. Then scroll to find out the biggest file size which is obviously the video file in Activity window, double-click it, even if it is still loading, after that, Safari will download it.

4. When the download is over, you will find a file named get_video, and you must add the extension .flv to it, by the way, the part before .flv can be replaced by any other text.

Now the download is finished, while Final Cut Pro does not support FLV files directly, thus we need a helpful converter to do us a favor. Please read on the following part.Are you going to download funs movies?

Part two: How to import YouTube video to FCP for editing?
Personally, I usually use Pavtube Video Converter for Mac to convert YouTube FLV files to MOV for FCP. Its operating process is as following:
1. Download, install and launch Pavtube Video Converter for Mac

2. Import YouTube videos, select FCP format and set save path
Click “Add” button to input FLV files downloaded from YouTube to this program, after that, select an output format for FCP by clicking the drop-down list of “Format”, here I select QuickTime MOV for example.

Also, you are allowed to click “Browse” to decide where to export the output MOV files, if not, the converter will save them to a destination folder set by default. By the way, if you want to join several YouTube videos to be a single file, you can tick the checkbox “Merge into one file” to achieve it. After conversion is completed, you are able to find the converted files via pressing button “Open”.

3. Set advanced settings
Suppose you are good at adjusting audio and video parameters, then you can press “Settings” to do this. You can reset all the items on the following window, like codec, bit rate, frame rate and so on.

4. Convert
After all the necessary settings are ready, you can click button “Convert” to start the conversion. Pavtube Video Converter for Mac can give you an estimated size of the final generated file, so that you can know if you have enough space to save the output files. Moreover, you will see it also shows you clearly how much time it has spent or how much time it will possibly cost to convert the rest part. The converting window is as below.

Some people may ask if there is a program that can process downloading and conversion at the same time, so that they do not spend too much time and energy on it. In fact, there is, and in Part three it will be introduced in detail.User Interface Flash Tool Tip Components Classic Tooltip.

Part three: How to download and convert YouTube video files for FCP simultaneously?

Step 1: Download, install and run Pavtube YouTube Converter for Mac
Pavtube is capable of processing downloading and conversion simultaneously. As soon as you launch it, the interface below will show up.

Step 2: Import YouTube URL, select FCP format and set store path
Hit button “Add URL” in the above window, and then the following interface will appear. Just copy and paste the URL of the YouTube video file which you want to download and convert to the text box of “URL”. Then select a workable format for FCP by clicking the drop-down list of “Convert To”. Here I choose MOV for instance.

Afterwards, you can insert the storage file name in the text box of “Save As”, otherwise, the program will generate a file name automatically. Meanwhile, you are allowed to hit “Browse” in the opposite side of “Save To” to specify where to locate the output MOV files. By the way, if you want to save the original FLV files, you are allowed to tick the checkbox “Save FLV File” to achieve this goal.

Step 3: Custom
This program enables you to adjust video and audio parameters like codec, bit rate, aspect ratio, frame rate, sample rate, etc, so that you can change them randomly according to your own requirements. Generally speaking, the larger values, the better quality, but the larger file size. Do remember click “OK” to save your custom settings.

Step 4: Download and convert
Once all the settings are done, you can click “OK” button to start. The following window will show you the progress of downloading and conversion, so as to manage your time properly. If batch downloading and conversion are under way, you can even go out for a walk or take a nap. After downloading and conversion are completed, you can click button “Open” to find the output MOV and FLV files.

Well, as soon as YouTube video conversion is finished, you can import the output MOV files to FCP to do further editing easily. My post seems longsome, but I sincerely hope it is informative.

How to download YouTube videos and import them to iMovie for editing?

YouTube always provides people with raw video materials on all sorts of things happened worldwide in real time. Video lovers are fond of downloading these files as private collection, even using video editors like iMovie to do further editing of their favorite ones, so as to import them to portable devices like iPod, iPhone, PSP, Blackberry, etc. for playback, or upload to their own websites to share with others, or do something else as they like. It helps you convert your dvd to 3gp converter, dvd to mobile and take it with you on your cell phone.

However, not all the people have found a proper way to download YouTube videos, not to mention how to add these files to iMovie for editing. YouTube videos are in the format of FLV, which is not a workable format in iMovie, so if you want to import YouTube videos to it without trouble, you should convert FLV files to iMovie compatible formats such as MPEG-4 and MOV in advance. With the special intention of solving these two problems, this guide will show you how to download YouTube videos and import them to iMovie for editing step by step. If you are in need, just feel free to go along with it.

Step 1: Download, install and run Pavtube YouTube Converter for Mac
This converter can process downloading and conversion simultaneously. Once you launch it, the interface below well pop up.

Pavtube iPhone video converter, can convert AVI, MPEG, WMV, MOV, etc to Apple iPod video.

Step 2: Add URL, select output format and set save path
Press tag “Add URL” in the above interface, and then the following window will appear. Just copy and paste the URL of the YouTube video file which you want to download and convert to the text box after “URL”. Then select a supportable format for iMovie by clicking the drop-down list of “Convert To”. Here I choose MOV for example.

Afterwards, you can insert the storage file name in the text box of “Save As”, if not, the program will generate one automatically. Here I save my file as “mycollection”. Meanwhile, you are allowed to hit “Browse” in the opposite side of “Save To” to specify the destination folder. By the way, if you want to save the original FLV files, you are allowed to tick the checkbox “Save FLV File” to achieve this goal.

Step 3: Custom
This program enables you to adjust video and audio parameters like codec, bit rate, aspect ratio, frame rate, sample rate, and channels, so that you can change them randomly according to your own demands. Generally speaking, the options which refer to values are always in condition of the larger values, the larger file size, but better quality. Do remember click “OK” to save your custom settings.

New and used mac laptop, Computers Networking on eBay USA.

Step 4: Download and convert


Once all the settings are done, you can click “OK” button to start. The following window will show you the progress of downloading and conversion.

Step 5: Import the output MOV files to iMovie
As soon as the YouTube video files have been downloaded and converted to MOV or other iMovie workable format, you can click “Open” at lower right corner of the above interface to find out the output files. Afterwards, launch iMovie, and click File>Import to add the output files to iMovie for editing.

All right, this guide is ending up now; hope it will do you a favor while downloading video files from YouTube as well as importing them to iMovie for further editing.

Wednesday, September 16, 2009

Where can download a free converter to convert AVI files to others?

I stopped using those to download because I always get a virus, which forces me to reformat my computer. Just search for direct downloads on the web like rapidshare, watch it on stream, or get it from a friend. Or just rent it from Safeway. Some of them have those machines now where you can rent a DVD for $1. Plus, direct downloads are faster since it doesn't depend on the other person's connection speed. If you watch movies a lot, get Netflix.DVD to iPod Converter Mac, powerful Mac DVD iPod converter, proves professional to convert DVD to iPod MP4, MP3, M4A(AAC).
I have a broadband connection of 100 Mbps. But when I try downloading movies using a torrent file, the max download speed that I get is somewhere between 20-30 Kb/s. Which means that it takes anywhere between 10-15 hrs to download a movie. I'm using Bitspirit V 3.0. Can anyone please help me out with increasing the downloading speed?
I think bittorrent is faster. Never heard of bitspirit. Just make sure you don't mess with the preferences.The fastest and easy-to-use HD Converter to convert HD video: AVCHD(.mts,.m2ts), H.264, MKV, WMV HD to AVI, Xvid, MPEG, MP4.
There are no guarantees with illegal downloads. Your speed may be affected and there is the obvious risk of downloading a virus or other infection
Now- Why would we help you download illegal movies faster????
Well the only way I can think of to make it download faster would be to download torrents with more sources- other than that all you can do is get a faster router.
hey instead of downloading movies from a torrent you can download it here my blog. It has links to download movies. And unlike a torrent it doesn't slow down the download speed. If their isn't a movie you want or you need help contact me :)DVD For Mac dvd to rip dvd AppleTV video ripper.
Use BitTorrent... and choose files with a lot of seeders.. You're only going to be able to download a file as fast as they can give it to you.. so more seeders=faster download speeds. On a side note, you'll probably never see the 100Mbps download speed... ever...
Don't use bittorrent, limewire, bitcomet, or any of those sharing ones. They have so many viruses and spyware.

Where can I download a video for wedding ceremony?

I has the best free TTS online for making wav files. They have voices in American, UK, and Indian English. I don't know that they have a Jamaican voice. You can turn electronic text into a wav file and download it quite easily. want to download songs for free onto my LG enV3 but since I use itunes, I don't know how to do that. Can I just put the songs directly on my phone from itunes or is there a process I need to go through?
You can't do anything.Mac MKV Converter, a professional conversion tool running on mac os x, can convert mkv with excellent output quality and fast speed.
The people at Apple are being complete idiots and not allowing non-Apple devices to sync with iTunes. You're out of luck.
Good question, but sorry no you can't. I was wondering the same thing so I searched the net. Turns out you can't. Apple only lets apple devices to download itunes. I bought an iTunes gift card a while ago at Target and I'm going to return because it's not compatible to my phone. Which is an LG Xenon.
Hope this helps. :)
Do you use songs that are BOUGHT from iTunes? Or do you just organize your music with iTunes? Because there, to me, is a huge difference.HD Video Converter can easily convert HD video formats such as AVCHD (mts, m2ts), H.264/AVC, MKV, MPEG-2 (ts), DivX, HD WMV, MPEG-4 and Quick Time.
If you buy songs from itunes, they are most likely not compatible with any other devices other than apple devices. There is a process you can go through to "unlock" these songs, but it takes time.
If you just use your iTunes to organize your songs that you bought on a CD or downloaded from another source, you can access these songs and move them to your phone.
All your songs should be located somewhere around :
My Music > Itunes > Itunes Music
Are you going to download funs movies?
Just find your song, and just drag and drop it onto the sd card of your phone!
Hope you figure this out! (:
I am looking for text to speech wav files in various accents. I want English, American, Jamacian, Indian and any others available. Is there a program or website I can use to make them and download for free.
YAKiToMe!
Sure. Go to YAKiToMe! for free text to wav or text to mp3, including downloading and podcasting. They have numerous readers in different languages with regional accents.

How can I download the mci test booklets and practice tests?

Leawo Free DVD to iPod Converter is a utility DVD to Video Converter, which supports batch conversion and can perfectly convert DVD to iPod video or audio formats for free, such as iPod MP4 video, MP3, M4A, WAV, AAC, etc.
I recommend that you use HandBrake to rip the DVD's. Handbrake is freeware and it works for both mac and windows, It will recognize the different titles and you can choose which title you want to rip.An excellent MOD converter Mac OS X software to convert MOD files to all popular format files.
But if it's copy protected, then you can use DVD Decrypter or DVD Shrink to remove the copy protection and after that you can use HandBrake to convert the dvd to mp4, avi or any other format.
All of them are free from charge, no watermark, you can download them here:
If they don't work, you can have a look at this guide to learn how to convert dvd to ipod mp4 format, thus you can sync the movie to ipod.Tod converter perfectly convert TOD to AVI so that the DV lovers can freely enjoy the recorded time.
If you still have questions, contact with me or keep asking on
Unbiased reviews and side-by-side comparisons of iPod Converter Suite gives you enough information to research the ins and outs of a particular product, It can help you decide which iPod Converter Suite is the best to meet your needs.
Some useful information you can get on the official site:
if you want do download DVDs for Free you can download Vuze its a torrent site very secure and it has everything :)Mac M2TS converter is a multifunctional software which helps you convert m2ts files to AVI, MPG, WMV.
if you want to put your DVD to your ipod a free site very good also and no trials its called VIdeora converter you can download it here:
Follow instructions and youre done Hope this helps :P
you can try leawo free dvd to ipod converter.it's free and clean, and it's easy to use.
You can get this software here
You may take a look at this guide, it will teach you how to rip DVD to iPod with VLC player, it's totally free without any limitation and watermark
Hope it helps. Contact me if you have any other question.
U can choose Pavtube DVD Ripper or Pavtube DVD to ipod converter.